White Balance & Color Correction Guide
Understanding Color Temperature
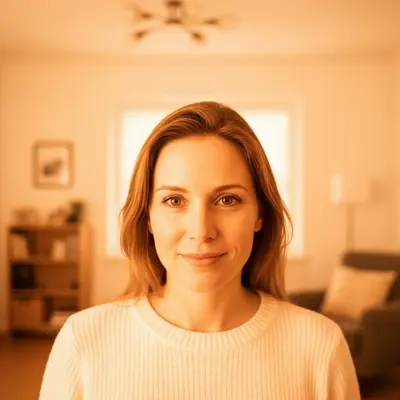
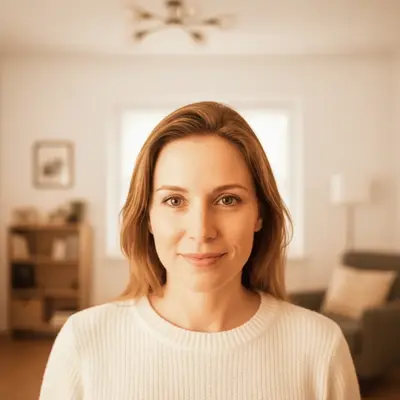
Color temperature measures the warmth or coolness of light, rated in Kelvin (K). Low numbers are warm (orange/yellow), high numbers are cool (blue). Candle light: ~1800K (very warm orange). Tungsten/incandescent bulbs: ~3200K (warm yellow-orange). Sunrise/sunset: ~3500K (warm golden). Daylight: ~5500K (neutral white). Overcast sky: ~6500K (slightly cool). Shade: ~7500K (cool blue). Blue sky: ~10000K (very cool blue). Your eyes automatically adjust to make white objects appear white under any lighting. Cameras don't. Auto white balance tries to compensate but often misses, especially under mixed lighting. The goal of white balance is to make neutral white objects actually appear white in the photo. When white balance is correct, all other colors fall into place.
Identify your light source
What's lighting the scene? Daylight, tungsten bulbs, fluorescent tubes, LED, or mixed.
Match the white balance
Set the camera's WB preset to match: Daylight, Tungsten, Fluorescent, Shade, Cloudy, or Auto.
Check a white reference
Look at something white in the image. If it looks orange, blue, or green, the white balance is off.
Camera White Balance Settings
Every camera and phone has white balance presets. Using the right preset for your lighting produces accurate colors without editing. Auto (AWB) works well in single-source lighting but struggles with mixed light. It's the default and handles most daylight situations adequately. Presets: Daylight (sun icon), Cloudy (cloud), Shade (house shadow), Tungsten (lightbulb), Fluorescent (tube light), Flash (lightning bolt). Each adds the opposite color to neutralize the light source. Custom white balance is the most accurate method. Photograph a white or gray card under your lighting conditions, then set the camera to use that image as the reference. This eliminates guesswork. Shoot RAW. If you shoot RAW format, white balance can be changed freely in editing with no quality loss. RAW captures the full color data regardless of the white balance setting at capture time.
Use the correct preset
Indoors under warm bulbs: Tungsten. Outdoors in sun: Daylight. Cloudy or shade: use those presets.
Use custom WB for accuracy
Photograph a white card, set as custom white balance. Best for product photography where color accuracy matters.
Shoot RAW for flexibility
RAW lets you change white balance after shooting with zero quality loss.
Common Color Cast Problems
Orange/yellow cast: shooting under tungsten or incandescent bulbs without correcting white balance. The most common indoor color problem. Switch to Tungsten WB preset or fix in editing. Blue cast: shooting in shade or under overcast skies without correcting. Shade reflects blue sky, making everything cooler than expected. Use Shade or Cloudy WB preset. Green cast: fluorescent lighting. Tube lights emit a green-shifted spectrum that makes skin look sickly. Set Fluorescent WB or fix in editing with a magenta tint shift. Mixed lighting is the hardest to fix. A room lit by both window light (blue) and tungsten lamps (orange) creates warm and cool areas in the same frame. Solution: turn off one source and use only the other, or fix it selectively in editing. Skin tone accuracy is the best indicator of white balance problems. When skin looks natural, the overall color balance is usually correct.
Check skin tones
Natural-looking skin means correct white balance. Orange, blue, or green skin indicates a color cast.
Eliminate mixed sources
Turn off room lights when using windows. Don't mix daylight with tungsten. One source at a time.
Identify the cast
Orange = too warm (tungsten). Blue = too cool (shade/overcast). Green = fluorescent. Pink = over-corrected green.
Fixing White Balance in Editing
If you shot in RAW, adjusting white balance in editing is lossless and straightforward. In Lightroom or Camera Raw, use the Temperature slider (blue-yellow axis) and Tint slider (green-magenta axis). The eyedropper tool is the fastest method. Click on something in the image that should be neutral gray or white. The software calculates the correction automatically. For JPEG images, white balance correction is more limited since the color data has already been processed and compressed. Large corrections degrade quality. This is why shooting RAW is recommended for any situation where color accuracy matters. Batch correction: If you shot a series of images under the same lighting, correct one image and sync the settings to all others. This ensures consistency across the set.
Use the eyedropper
Click on a neutral gray or white area in the image. Software auto-corrects the white balance.
Adjust Temperature slider
Move right (warmer) to fix blue cast. Move left (cooler) to fix orange cast.
Adjust Tint slider
Move toward magenta to fix green cast. Move toward green to fix magenta/pink cast.
Creative Color Grading
While correcting color casts aims for accuracy, creative color grading intentionally shifts colors for mood and atmosphere. Warm tones (golden, amber) create feelings of nostalgia, comfort, and warmth. Popular for golden hour photography, food, and cozy scenes. Cool tones (blue, teal) create feelings of calm, professionalism, and modernity. Popular for corporate photography, technology, and winter scenes. Teal and orange is the most popular color grading combination. Shadows shift toward teal/blue while highlights and skin tones shift toward warm orange. This creates visual contrast and a cinematic look. Desaturated/muted tones create a film-like, editorial aesthetic. Reduce overall saturation by 15-25% and slightly lift the black point for a faded look.
Start with correct white balance
Creative grading works best when starting from an accurately color-corrected base.
Choose a color direction
Warm for nostalgic/cozy. Cool for modern/professional. Teal-orange for cinematic.
Apply subtly
Less is more. A subtle shift looks intentional. A heavy shift looks like a mistake.
AI Color Correction
AI color correction handles white balance fixes without manual slider adjustments. Describe the problem in plain language and the AI applies the appropriate correction. For standard correction: 'fix the color cast and make whites look neutral' or 'correct the white balance to daylight'. For specific issues: 'fix the orange/yellow color cast from indoor lights' or 'remove the green tint from fluorescent lighting'. For product photography where color accuracy is critical: 'make the product colors accurate and true to life' or 'ensure the white background is pure neutral white'. Creative grading with AI: 'add a warm golden tone to the photo' or 'give this a cool, blue cinematic look' or 'apply a teal and orange color grade'.
Describe the problem
'Fix the yellow color cast' or 'make the whites look neutral and accurate.'
Be specific about the source
'Remove the orange cast from indoor tungsten lighting' gives the AI more context for accurate correction.
Try creative grades
'Add a warm golden tone' or 'apply a cinematic teal and orange look' for stylistic color changes.
Frequently Asked Questions
Photos have a color cast?
Fix yellow, blue, green, and orange color casts instantly. Upload and describe the problem. Free, no signup.
Fix My Colors
Free to try · no sign-up · photos are never shared
Release to upload