Real Estate Photography Guide
Equipment You Need
Professional real estate photography doesn't require expensive gear, but a few key items make a significant difference. A wide-angle lens is essential. On a full-frame camera, 16-24mm works well. On a crop sensor, 10-18mm. On a smartphone, use the 0.5x ultra-wide lens. Wide angles make rooms look larger and capture more of the space in a single frame. A tripod is non-negotiable for interiors. It allows slower shutter speeds for proper exposure, keeps verticals straight, and enables HDR bracketing. Any basic tripod works. An external flash bounced off the ceiling helps in dark rooms, but isn't essential if you bracket exposures and blend them in editing. Natural light plus HDR handles most situations.
Get the wide lens
Camera: 16-24mm on full frame. Phone: use the 0.5x ultra-wide mode. Avoid fisheye distortion.
Set up the tripod
Level the camera at waist height (about 4 feet). This height shows the room naturally without extreme perspective distortion.
Enable bracketing
Set your camera to bracket 3-5 exposures at 2-stop intervals for HDR blending in post.
Shooting Interior Rooms
Interior photography is about making rooms feel spacious, bright, and inviting. The biggest mistakes are shooting from the wrong position and improper exposure. Shoot from corners. Standing in a corner and shooting diagonally across the room captures the maximum floor space and gives the best sense of room size. Keep the camera at waist height (about 4 feet). Eye-level shots tilt down and show too much floor. Lower shots show more ceiling and feel unnatural. Waist height is the sweet spot. Turn on all lights and open all blinds before shooting. The combination of natural and artificial light adds warmth. But be ready to correct the color cast difference in editing. Declutter before shooting. Remove personal items, excess furniture, and anything distracting. The less visual noise, the more appealing the space appears.
Declutter the space
Remove personal items, excessive decor, and anything that makes the space feel smaller.
Shoot from corners
Position the camera in the corner, shooting diagonally across the room. This maximizes perceived space.
Light everything
Turn on all lights, open all blinds and curtains. Light rooms photograph larger.
Straighten verticals
Keep the camera perfectly level. Tilted verticals (walls leaning inward) look unprofessional.
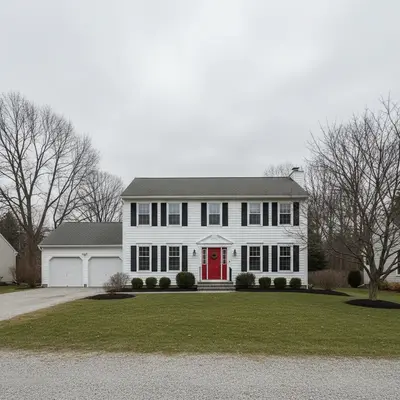
Shooting Exteriors
Exterior shots are the first thing buyers see. They set expectations and drive click-through rates on listing sites. Shoot during blue hour (20-30 minutes after sunset) with interior lights on for the most dramatic look. The warm window glow against the blue sky is the gold standard for luxury real estate photography. For daytime exteriors, overcast skies provide even lighting but look flat. Partly cloudy days give dimension. Clear blue skies with the sun behind you produce the most marketable look. Include just enough landscaping and context to show the property's setting without revealing neighboring properties that might be less appealing.
Scout the angle
Walk around the property and find the angle that shows the most of the front facade. Slightly off-center is usually best.
Time it right
Blue hour with lights on for luxury. Late afternoon golden light for warm daytime shots. Avoid harsh midday sun.
Include the yard
Show landscaping, driveway, and surroundings. Mow the lawn, move cars, and clean up before the shoot.
HDR and Exposure Blending
Real estate interiors have extreme dynamic range: bright windows and dark room corners in the same frame. A single exposure either blows out the windows or makes the room too dark. HDR (High Dynamic Range) solves this by merging multiple exposures. Take 3-5 bracketed shots at 2-stop intervals. Merge in Lightroom, Photomatix, or any HDR software. The result shows detail in both the bright windows and dark corners. The key is natural-looking HDR. Over-processed HDR with halos and oversaturated colors is a common beginner mistake. Aim for a result that looks like what your eyes see when standing in the room.
Bracket your exposures
3 shots minimum: one exposed for the room, one for the windows, one in between. 5 shots for extreme contrast.
Merge naturally
Use HDR software with conservative settings. Avoid heavy tone mapping that creates halos around windows.
Fix remaining issues in AI
Upload to EditThisPic: 'make the window view visible without darkening the room' or 'balance the exposure between inside and outside'.
Virtual Staging with AI
Empty rooms are hard to sell. Virtual staging adds furniture and decor digitally, helping buyers visualize the space. AI has made this dramatically faster and cheaper than traditional virtual staging services. Upload the empty room photo and describe the staging: 'add modern living room furniture with a gray sofa, coffee table, and rug' or 'stage this bedroom with a queen bed, nightstands, and warm lighting'. Be specific about style. 'Modern minimalist', 'farmhouse', 'mid-century modern', or 'Scandinavian' gives the AI clear direction. Match the staging style to the property's target buyer demographic. Always disclose virtual staging in listings. Most MLS systems require it, and it's an ethical best practice.
Upload the empty room
Shoot the empty room at proper angle and lighting first. Good base photos produce better staging.
Describe the staging
'Add modern living room furniture: gray sectional sofa, wooden coffee table, neutral area rug, floor lamp.'
Match the home's style
Stage a modern condo differently than a farmhouse. The furniture style should match the architecture.
Disclose in the listing
Label virtually staged photos. Most MLS systems require disclosure.
Common Post-Processing Fixes
Even well-shot real estate photos often need editing. AI handles the most common fixes in seconds. Sky replacement transforms a gray, overcast exterior into a bright blue-sky showcase. Vertical correction fixes converging lines when the camera was tilted. Clutter removal handles items you missed during the shoot. Power line removal is one of the most requested real estate edits. 'Remove all power lines and show clear sky' handles it instantly. Wire removal, car removal from driveways, and neighbor house edits are all common.
Fix the sky
'Replace the overcast sky with a bright blue sky and white clouds' transforms exterior appeal instantly.
Remove wires and distractions
'Remove all power lines' and 'remove the cars from the driveway' for cleaner exterior shots.
Brighten interiors
'Brighten the room and make it feel more inviting' or 'make the lighting warmer and more welcoming'.
Frequently Asked Questions
Need to fix your listing photos?
Remove clutter, swap skies, virtually stage, fix lighting. Upload and describe. Free, no signup.
Edit Listing Photos
"replace the sky in this property photo with a clear blue sky"
Release to upload