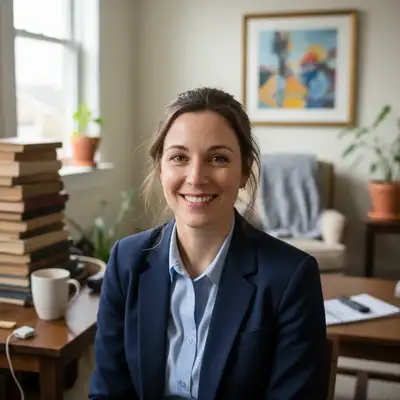
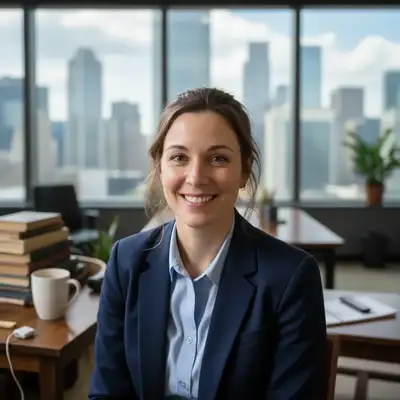
Change Background from Photo
Describe any background you want. Beach, office, gradient—just type it.
Type 'change the background to a sunny beach scene' and EditThisPic transforms your photo in 15-30 seconds. No selection tools, no masking. Just describe the new background you want—a coffee shop, mountain vista, or abstract gradient. The AI handles subject detection and scene matching automatically. Free, no signup.
How it works
Upload your photo
Drop your image into EditThisPic. JPG, PNG, and WebP up to 7MB. Photos with clear subject separation from the background work best, but the AI handles complex scenarios like hair and semi-transparent objects too.
Describe the new background
Type exactly what you want: 'change the background to a tropical beach at sunset' or 'change background to modern minimalist office.' Be specific about lighting, mood, and atmosphere. No marking needed—the AI knows what 'background' means and will preserve your subject.
Copy one of these to get started:
change the background to a modern corporate office with soft natural light through windows, professional atmosphere
change the background to the Eiffel Tower at golden hour, soft warm lighting matching the subject
change the background to a rustic wooden kitchen counter with morning sunlight streaming in from the right
change the background to a tropical beach with turquoise water, white sand, and palm trees under bright midday sun
3 more prompts
change the background to flowing colorful abstract gradients in purple and teal, artistic studio photography style
change the background to a misty forest with tall pine trees and soft diffused morning light
change the background to a busy Tokyo street at night with neon signs and bokeh city lights, cinematic mood
Generate and review
Tap generate and check the result at full zoom. Verify that subject edges blend naturally with the new scene, lighting feels consistent, and the overall composition looks believable.
Refine with markers if needed
If the AI changed something you wanted to keep, or edges look unnatural, tap markers on those specific areas and regenerate. This is optional—most background changes work without any marking.
"Needed my headshot on a professional office background for a proposal. Typed exactly that and got three usable options in under a minute." @FreelanceMarkDev
See it in action
Living room to corporate office
Professional needed a headshot with office background but only had casual home photos. One prompt created a convincing corporate setting.
change the background to a modern corporate office with large windows, city skyline visible, soft professional lighting
Backyard to tropical beach
Family photo taken in the backyard transformed into a vacation memory. Lighting was matched to create a believable beach scene.
change the background to a tropical beach with white sand, turquoise ocean, and palm trees, bright sunny day matching the subjects' lighting
Product on desk to lifestyle kitchen
Coffee mug product shot needed lifestyle context for marketing. Changed from plain desk to cozy kitchen scene with matching warm lighting.
change the background to a warm rustic kitchen counter with brick wall, soft morning window light from the left, cozy coffee shop atmosphere
If something looks off
AI changed the wrong area or something I didn't want changed
Why: The AI interpreted 'background' differently than you expected, possibly including parts of your subject or missing areas you wanted changed.
Tap a marker on the specific area you want to keep unchanged, then regenerate with the same prompt
💡 Markers tell the AI 'I mean THIS area specifically.' Use them when description alone is ambiguous.
New background lighting doesn't match subject
Why: You described a scene but not its lighting direction. A sunset behind the subject looks wrong if their face is lit from the front.
change the background to [your scene] with lighting direction matching the subject, light source from [direction your subject is lit from]
💡 Look at shadows on your subject's face to determine where the original light came from, then mention that in your prompt.
Subject edges look cut-out or unnatural against new scene
Why: The contrast between your original photo quality and the generated background creates a visible mismatch at the boundaries.
change the background to [your scene] with natural edge blending and subtle ambient glow around the subject
💡 Adding 'subtle ambient glow' or 'natural edge integration' helps blend the subject into the new scene.
Generated scene doesn't look realistic
Why: The description was too vague or asked for conflicting elements. 'Beach at night with sunny weather' confuses the AI.
change the background to [specific scene] at [specific time of day] with [specific weather], photorealistic style
💡 Be consistent with time, weather, and lighting. 'Sunset beach' works; 'sunset beach with midday shadows' doesn't.
Hair or fine details blend poorly with new background
Why: Fine edges like hair are the hardest to separate cleanly. The original background may be bleeding through at strand level.
change the background to [your scene] preserving all hair strand detail with clean separation and no color fringing
💡 If hair edges still look rough, tap markers on the problem areas and regenerate.
Background scale looks wrong (too close or too far)
Why: The AI generated a scene at a different depth than expected. A distant mountain shouldn't look like it's 10 feet away.
change the background to [your scene] in the far distance with appropriate depth and perspective matching the subject
💡 Add depth cues: 'distant mountains with atmospheric haze' or 'close-up office desk with shallow depth of field.'
Quick answers
Do I need to mark the background before describing?
No! Just describe the new background you want: 'change the background to a beach sunset' or 'change background to modern office.' The AI understands what 'background' means without selection. Only use markers if you need to refine specific areas after your first attempt.
How do I make the new background look realistic?
Match lighting direction and intensity. If your subject is lit from the left, mention that: 'change background to beach scene with sunlight from the left matching the subject.' Also add weather and time of day for consistency: 'at golden hour' or 'on an overcast day.'
Can I change the background to a specific photo I have?
EditThisPic generates new backgrounds based on descriptions rather than compositing existing images. Describe what you want as specifically as possible—the AI can create highly specific scenes like 'modern Tokyo street with cherry blossoms' or 'cozy cabin interior with fireplace.'
What's the difference between changing and removing the background?
Removing creates transparency or solid colors—useful for product photos and design work. Changing replaces with a realistic scene—useful for portraits, creative composites, and lifestyle imagery. Use 'change background to beach' for scenes, 'replace background with white' for product shots.
Why does my subject look pasted onto the new background?
Usually a lighting mismatch. Your subject was lit differently than the scene you described. Fix by adding lighting direction to your prompt: 'change background to sunset beach with warm light from the right side matching the subject.' Also try adding 'natural edge blending' to soften the transition.
Ready to change your background?
Free to try. No signup required.