Free β€’ No signup Enhance Property photos with HDR Β· Free

AI HDR Enhancement for Real Estate Photos

Fix blown windows and dark interiors in one prompt. MLS-ready photos without expensive HDR software.

Living room with blown out windows and dark interior
Before
β†’
Same room with balanced exposure showing outdoor view and bright interior
After

Real Estate HDR Enhancement

Upload photo to enhance property photos with HDR

Free β€’ Results in 30 seconds β€’ No signup

Release to upload

FreeNo signupNo watermark
Popular use cases:
  • real estate HDR
  • property photo enhancement
  • listing photo editing
  • MLS photo enhancement
  • interior photo HDR
  • window exposure fix
  • real estate photography
  • home listing photos

Cost
Free No signup required
Time
Instant results in 15-30 seconds
Works on
Any device - browser, phone, tablet, desktop
Powered by
AI-powered photo editing
Scenario Prompt Time
Window + interior balance balance exposure between windows and interior, recover view 25s
Brighten dark room brighten room naturally, enhance shadows, listing ready 20s
Mixed lighting fix balance daylight and indoor lights, correct color cast 30s

How it works

  1. Upload your interior photo

    Drop your room photo into EditThisPic. Works with any camera - phone, DSLR, or point-and-shoot. Single exposures work perfectly; no need for bracketed HDR shots. JPG, PNG, WebP up to 7MB.

    Expect: Simple exposure fix: 20-25 seconds. Complex multi-zone HDR with mixed lighting: 30-40 seconds.
  2. Describe the HDR look you want

    Type your instruction: 'balance exposure between windows and interior, recover window view detail, brighten the room naturally.' Be specific about which areas need adjustment. No marking needed - the AI understands real estate photo needs and knows where windows, shadows, and dark areas are.

    Tip: Mention 'MLS-ready' or 'listing quality' to get the professional real estate photo look that agents and buyers expect.

    Copy one of these to get started:

    Bright interior with window view balance the exposure between the bright windows and dark interior, recover the outdoor view through windows, brighten the room naturally for real estate listing
    Dark room brightening brighten the entire room while keeping the lighting natural, enhance shadows to show all architectural detail, make it look inviting for buyers
    Balanced exposure whole house balance daylight from windows with indoor lights, correct any yellow color cast from tungsten bulbs, create even professional lighting throughout
    Exterior HDR enhancement enhance this exterior property photo with HDR-quality lighting, balance the sky with the house, show detail in both shadows and highlights
    3 more prompts
    Luxury property enhancement enhance this luxury property photo with professional HDR quality, rich colors, balanced exposure, every surface and finish clearly visible, magazine-quality lighting
    Commercial space lighting balance the fluorescent office lighting with window daylight, remove green color cast, brighten all areas evenly for commercial listing
    Overexposed room fix reduce the overexposure in this room, recover detail in the bright areas, restore natural contrast without making it dark
  3. Review the balanced result

    Check that window views are visible without looking fake. Verify the interior is bright but still natural. Shadows should be lifted without looking artificially flat. The room should feel inviting and spacious.

  4. Fine-tune specific areas if needed

    If one window is still too bright or a corner is still too dark, tap a marker on that specific spot and describe the fix. Most photos are perfect on the first try.

    Tip: For rooms with multiple windows at different exposures, address them in separate refinements for best results.
Try it free ↓

Real Estate HDR Enhancement

Upload photo to enhance property photos with HDR

Free β€’ Results in 30 seconds β€’ No signup

Release to upload

Free β€’ No signup

"Shot a listing at noon - windows completely blown out, interior dark as a cave. One prompt and both looked perfect. Client thought I hired a professional photographer." @RealtorDIY

See it in action

Living room with blown out windows and dark interior
Before
->
Same room with balanced exposure showing outdoor view and bright interior
After

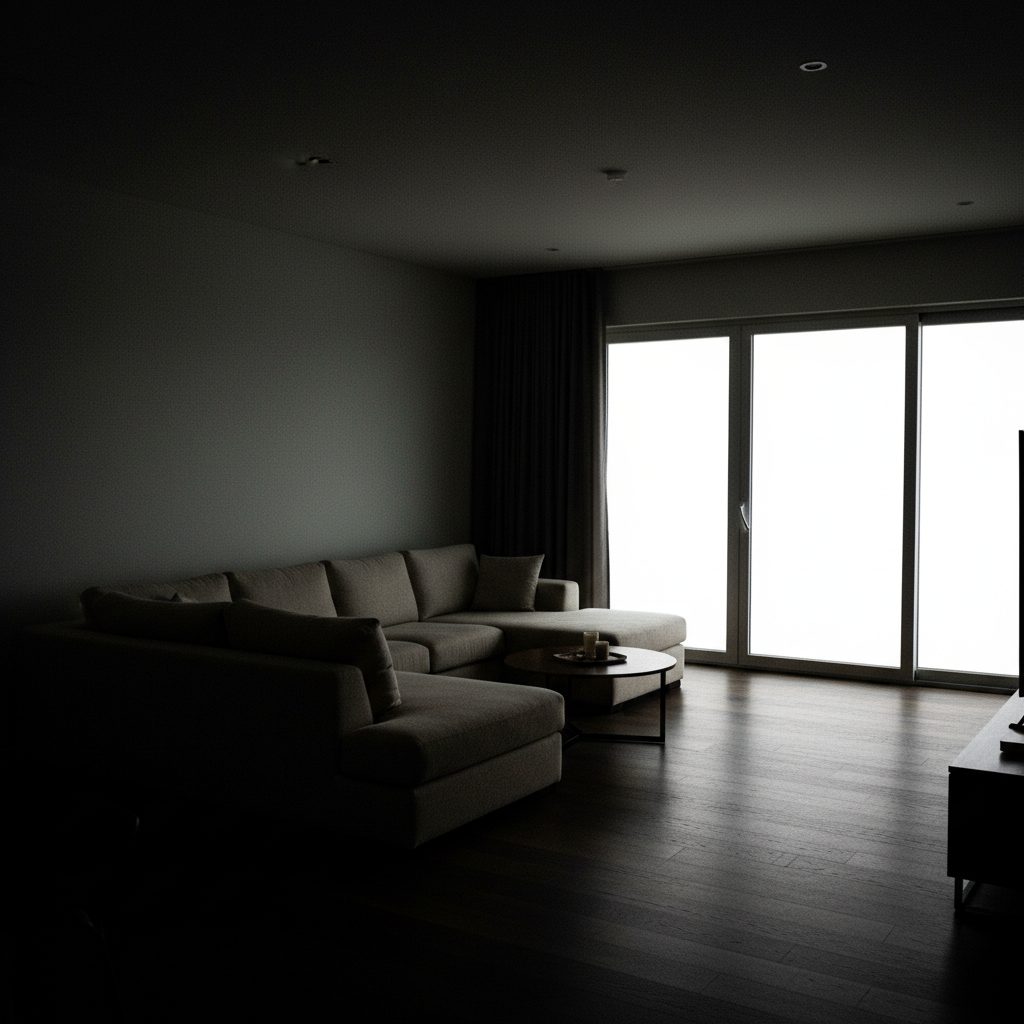
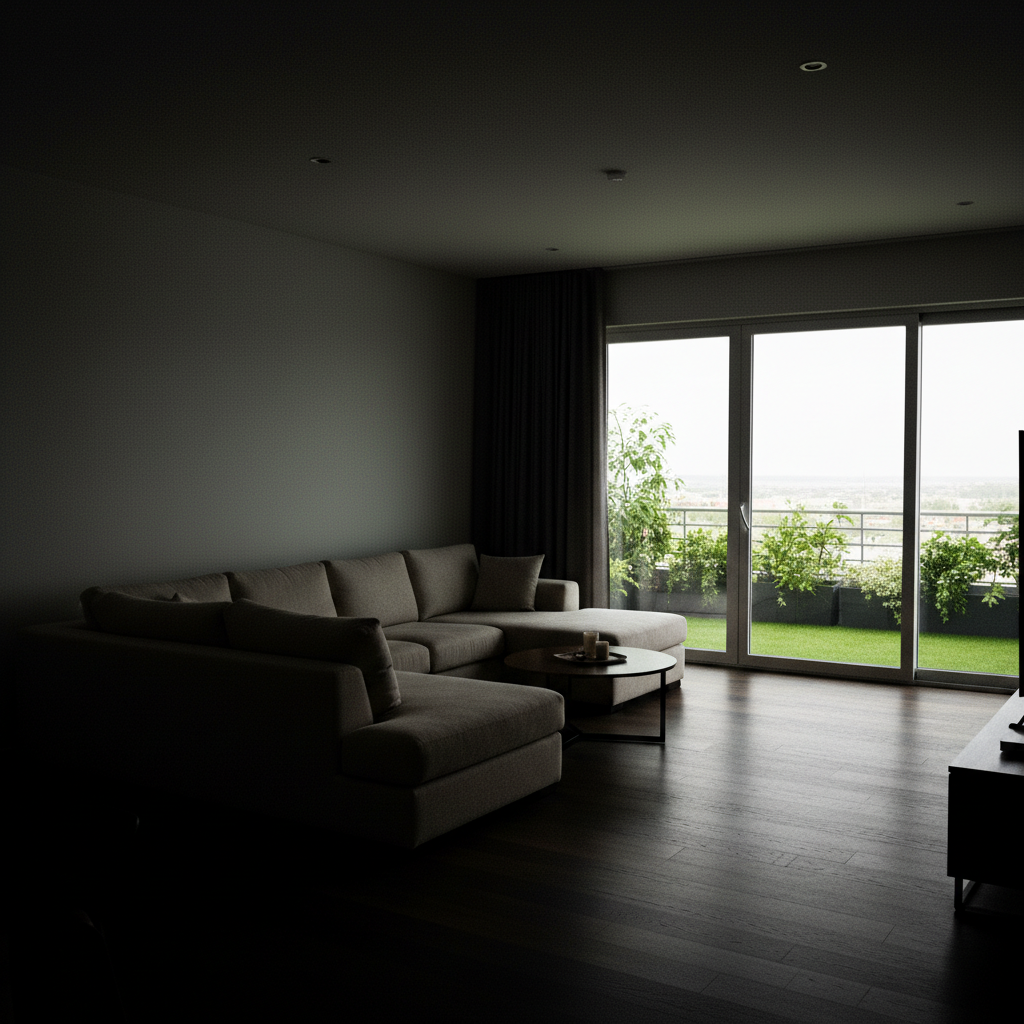
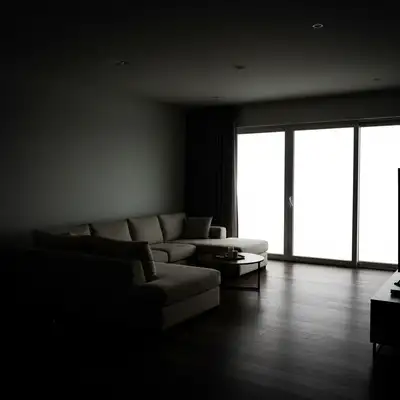
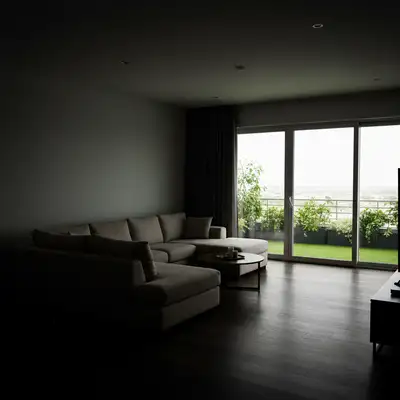
Living room window recovery

Classic real estate problem: beautiful window view completely blown out, interior dark despite all lights on.

Prompt: balance the exposure between the bright windows and dark interior, recover the outdoor view through windows, brighten the room naturally for real estate listing
Kitchen with blown window and yellow color cast from mixed lighting
Before
->
Kitchen with balanced natural light and corrected colors
After

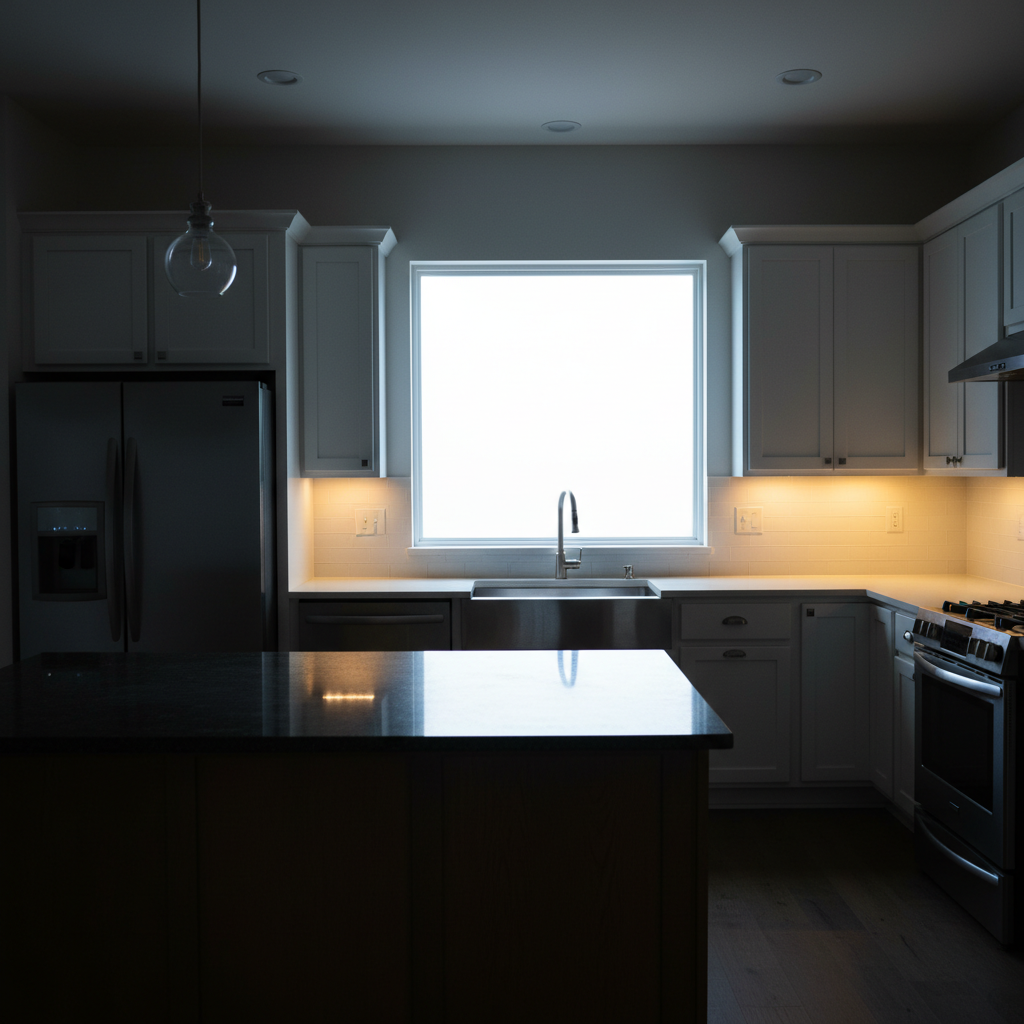
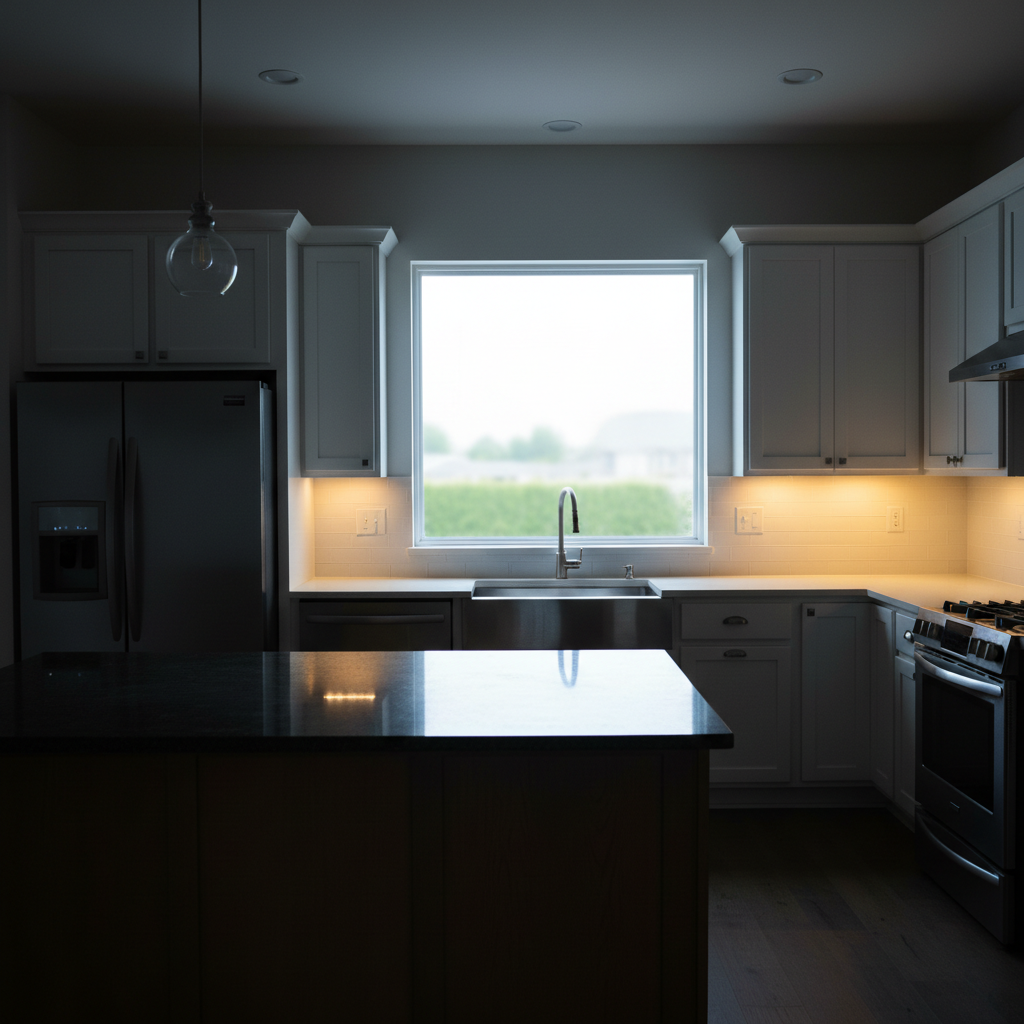
Kitchen daylight balance

Kitchen with large window over sink - window is blown, counter area in shadow. Mixed tungsten and daylight creating color issues.

Prompt: balance the daylight from windows with indoor lights, correct any yellow color cast, create even professional lighting throughout the kitchen
Dark bedroom with overexposed windows
Before
->
Bright inviting bedroom with visible window view
After

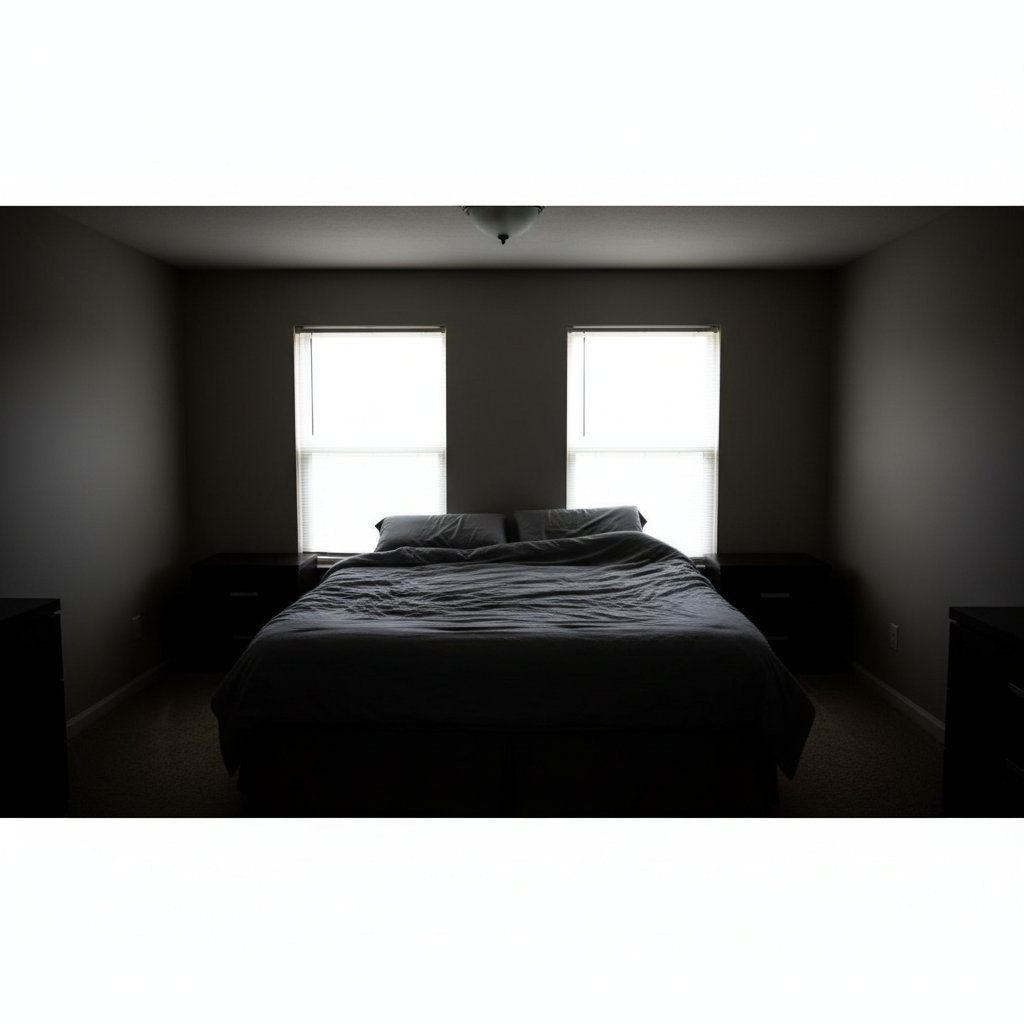
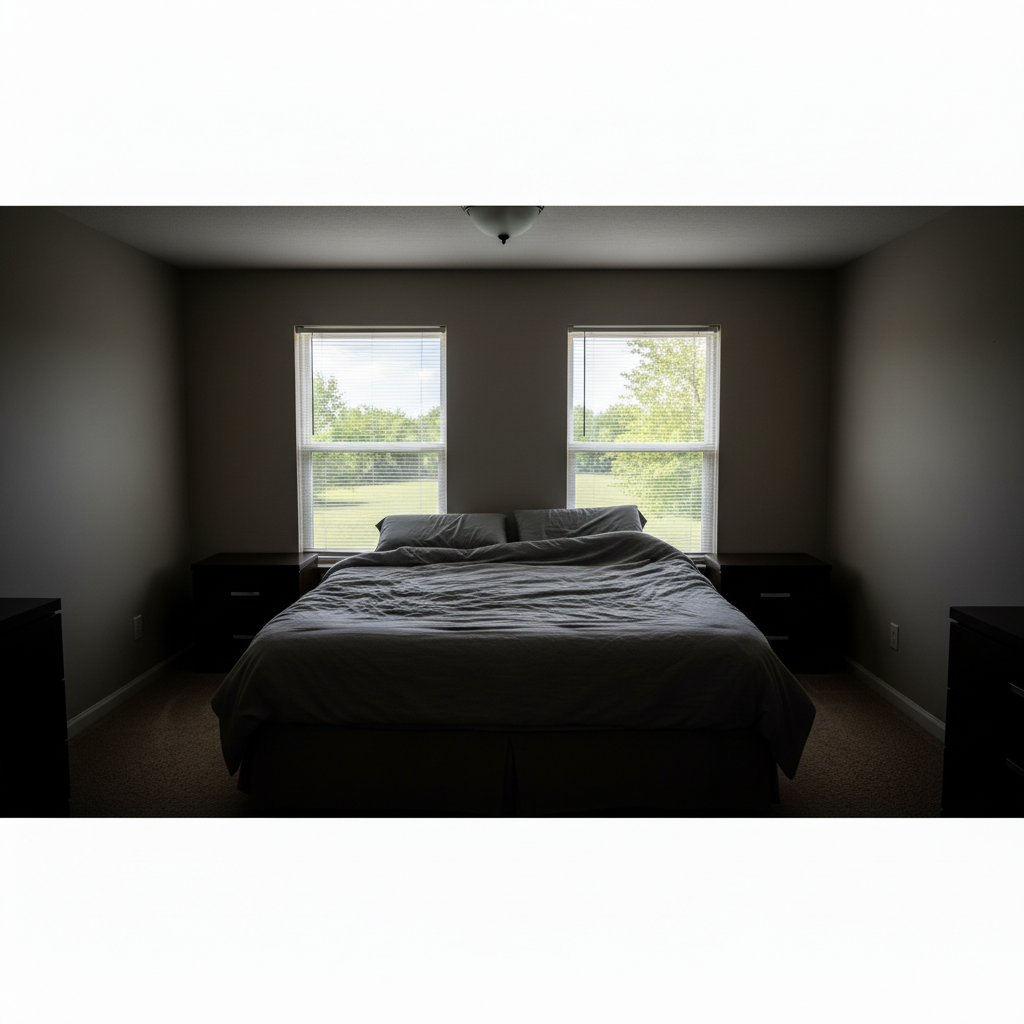
Master bedroom transformation

Bedroom looked dark and uninviting despite large windows. Buyers couldn't appreciate the space or the view.

Prompt: brighten the entire bedroom while keeping lighting natural, recover the window view, make the space feel bright and inviting for listing photos

Detailed Guides by Scenario

πŸ“·

Listing Photo Enhancement

Transform phone photos into professional-quality listing images that make properties sell faster.

Common Scenarios

  • Fixing blown-out windows in living room and kitchen shots before uploading to MLS
  • Brightening dark basement or interior rooms to appear spacious and inviting to buyers
  • Balancing mixed lighting in bathrooms and kitchens for consistent listing presentation

Best Practices

  • Shoot with all lights on and curtains open for the most recoverable dynamic range
  • Mention 'listing quality' or 'MLS-ready' in your prompt for the professional real estate look
  • Process all rooms with the same enhancement style for cohesive listing photos
πŸ“·

Property Photographer Workflow

Speed up post-processing for real estate photographers who need fast turnaround on multi-room shoots.

Common Scenarios

  • Quick HDR processing when you shot single exposures instead of brackets
  • Recovering shots where window exposure overwhelmed the camera sensor
  • Color-correcting rooms with mixed tungsten and daylight sources

Best Practices

  • Use consistent prompts across all rooms in a property for uniform results
  • For challenging exposures, do a two-pass workflow: balance first, then color correct
  • Download at full resolution for print-quality flyers and brochures
πŸ“·

DIY Home Seller

Make your own listing photos look professional without hiring a photographer.

Common Scenarios

  • Enhancing phone photos to compete with professionally photographed listings nearby
  • Fixing dark or poorly lit rooms that make your home look smaller than it is
  • Preparing photos for FSBO listings on Zillow, Redfin, or Facebook Marketplace

Best Practices

  • Take photos during the day with all lights on for the best starting point
  • Shoot from corners at chest height for the classic real estate wide-angle look
  • Enhance each room consistently so your listing looks cohesive and professional

If something looks off

HDR looks fake or over-processed

Why: The AI was too aggressive with tone mapping, creating the 'HDR grunge' look that buyers dislike.

Try: balance exposure more subtly, keep the lighting looking completely natural, avoid HDR artifacts

Tip: Adding 'natural' or 'realistic' to your prompt prevents the hyper-processed look.

Windows still blown out after processing

Why: Extremely overexposed windows may have no recoverable detail in the original photo.

Try: Tap markers on the window areas, then: replace the blown white window with realistic outdoor view, trees and blue sky

Tip: When detail is truly gone, the AI can generate a believable outdoor scene that matches the window frame.

Interior too bright, looks washed out

Why: Brightening was applied too aggressively, losing contrast and depth in the room.

Try: reduce the interior brightness slightly, restore natural contrast and shadows, keep it inviting but not flat

Tip: Some shadow is good - it creates depth and makes rooms feel three-dimensional.

Colors look wrong after enhancement

Why: The exposure adjustment shifted color balance, or mixed lighting wasn't fully corrected.

Try: correct the color balance to neutral daylight, remove any color casts, keep exposure balanced

Tip: Do exposure balance first, then color correction as a separate step if needed.

AI changed the wrong area or something I didn't want changed

Why: The AI couldn't determine exactly which area you meant from description alone. This happens with ambiguous requests.

Try: Tap a marker on the specific area you want to change, then regenerate with the same prompt

Tip: Markers tell the AI 'I mean THIS one specifically.' Use them when description alone is ambiguous.

One window looks different from others

Why: Multiple windows at different exposure levels may not balance equally in one pass.

Try: Tap markers on the problem window, then: match this window exposure to the others, same brightness and outdoor view clarity

Tip: For rooms with 3+ windows, you may need targeted adjustments after the initial balance.

Quick answers

Do I need to mark the windows before asking for HDR enhancement?

No! Just describe what you want: 'balance the exposure between windows and interior' and the AI knows exactly which areas to adjust. Markers are only needed for precision - like adjusting one specific window differently from others.

Will this work with phone photos or do I need a professional camera?

Phone photos work great. The AI enhances whatever you have - iPhone, Android, point-and-shoot, or DSLR. You don't need bracketed HDR exposures or RAW files. Single JPEG shots from any camera can be transformed into professional-looking listing photos.

How do I fix blown out windows in real estate photos for free?

Upload your interior photo to EditThisPic and type 'balance the exposure between windows and interior, recover the outdoor view.' The AI recovers window detail and brightens dark interiors in 20-30 seconds. Free to try, no account required.

Is there a free HDR tool for real estate photos that doesn't require login?

Yes. EditThisPic is free to try with no account required. Upload your listing photo, describe the exposure balance you want, and download the enhanced result. No watermarks on your images.

Can I use these enhanced photos on MLS and Zillow?

Yes. The enhanced photos are yours to use anywhere - MLS, Zillow, Redfin, Realtor.com, social media, print flyers. The enhancements are standard real estate photography processing, not adding or removing structural elements.

What's the best free AI tool for real estate photo enhancement?

EditThisPic handles the most common real estate photo problems - blown windows, dark interiors, mixed lighting - with simple text prompts. Unlike traditional HDR software, you don't need to learn complex tools or shoot bracketed exposures.

How is this different from the HDR mode on my phone?

Phone HDR captures multiple exposures at the moment of shooting. EditThisPic enhances photos after the fact - perfect for shots where you didn't use HDR mode, or where the phone's HDR wasn't enough for extreme indoor/outdoor contrast.

Is EditThisPic's real estate HDR enhancement really free?

Yes - you get 1 free edit per week, no account needed. For unlimited edits, plans start at $3.99/month.

Ready to transform your listing photos?

Free to try. No signup required.