Free โ€ข No signup Overlay Photos ยท Free

Overlay Photos

Upload two photos and describe how to position the overlay. No layer tools required.

Product photo and logo as separate images
Before
โ†’
Product photo with logo overlaid in corner
After

Overlay Photos

Drop your photo here

or click to browse

Release to upload

Free โ€ข No signup

Advertisement
Popular use cases:
  • Product photo branding
  • Logo watermarks
  • Decorative photo frames
  • E-commerce badges
  • Social media graphics
  • Sticker overlays
  • Certificate backgrounds

Cost
Free No signup required
Time
Instant results in 15-30 seconds
Works on
Any device - browser, phone, tablet, desktop
Powered by
AI-powered photo editing
Scenario Prompt Time
Logo corner overlay logo in bottom right at 15% width with slight transparency 20s
Frame overlay place frame around the entire photo fitting to edges 25s
Center watermark overlay watermark in center at 30% opacity 20s
Angled badge place badge in top right at slight angle 20s

How it works

  1. Upload your background photo

    Drop your main image into EditThisPic. This is the base photo that the overlay will be placed on top of. JPG, PNG, and WebP up to 7MB all work.

    Expect: Simple overlays: 20-30 seconds. Complex positioning with resizing: may need 2-3 refinements.
  2. Add your overlay image

    Click the reference image button and upload the photo, logo, or graphic you want to overlay. PNG images with transparent backgrounds work best for clean overlays, but the AI can handle any image format.

    Tip: If your overlay doesn't have a transparent background, the AI can often figure out what to place and remove the background automatically.
  3. Describe the overlay placement

    Type your instruction: 'overlay the logo in the bottom right corner at 20% size' or 'place the frame around the entire photo.' Specify position, size, and opacity if needed. The AI positions the overlay exactly where you describe.

    Tip: Use specific positions: 'top left corner,' 'center,' 'bottom right with padding' for precise placement.

    Copy one of these to get started:

    Logo in corner overlay the logo in the bottom right corner, sized to about 15% of the image width with slight transparency
    Decorative frame place the frame overlay around the entire photo, fitting it perfectly to the edges
    Center watermark overlay the watermark in the center of the image with 30% opacity so the photo shows through
    Sticker placement place the sticker in the top left area, angled slightly and sized to look natural like it was stuck on
    3 more prompts
    Product badge overlay the sale badge in the top right corner at a slight angle, making it prominent but not blocking the product
    Multiple positioning place the logo in all four corners of the image, each one small and subtle
    Transparent gradient overlay overlay the gradient on the bottom third of the image, fading from transparent at top to solid at bottom for text space
  4. Generate and adjust

    Tap generate and review the overlay placement. Check positioning, size, and visibility. If the overlay needs adjustment, describe the change: 'move it slightly left' or 'make the overlay larger.'

    Tip: If positioning isn't quite right, tap a marker where you want the overlay and regenerate.
Try it free โ†“

Overlay Photos

Drop your photo here

or click to browse

Release to upload

Free โ€ข No signup

"Added my business logo to 20 product photos in minutes. Each one positioned perfectly without me touching any layer controls." @ShopOwner_Mike

See it in action

Product photo and logo as separate images
Before
->
Product photo with logo overlaid in corner
After

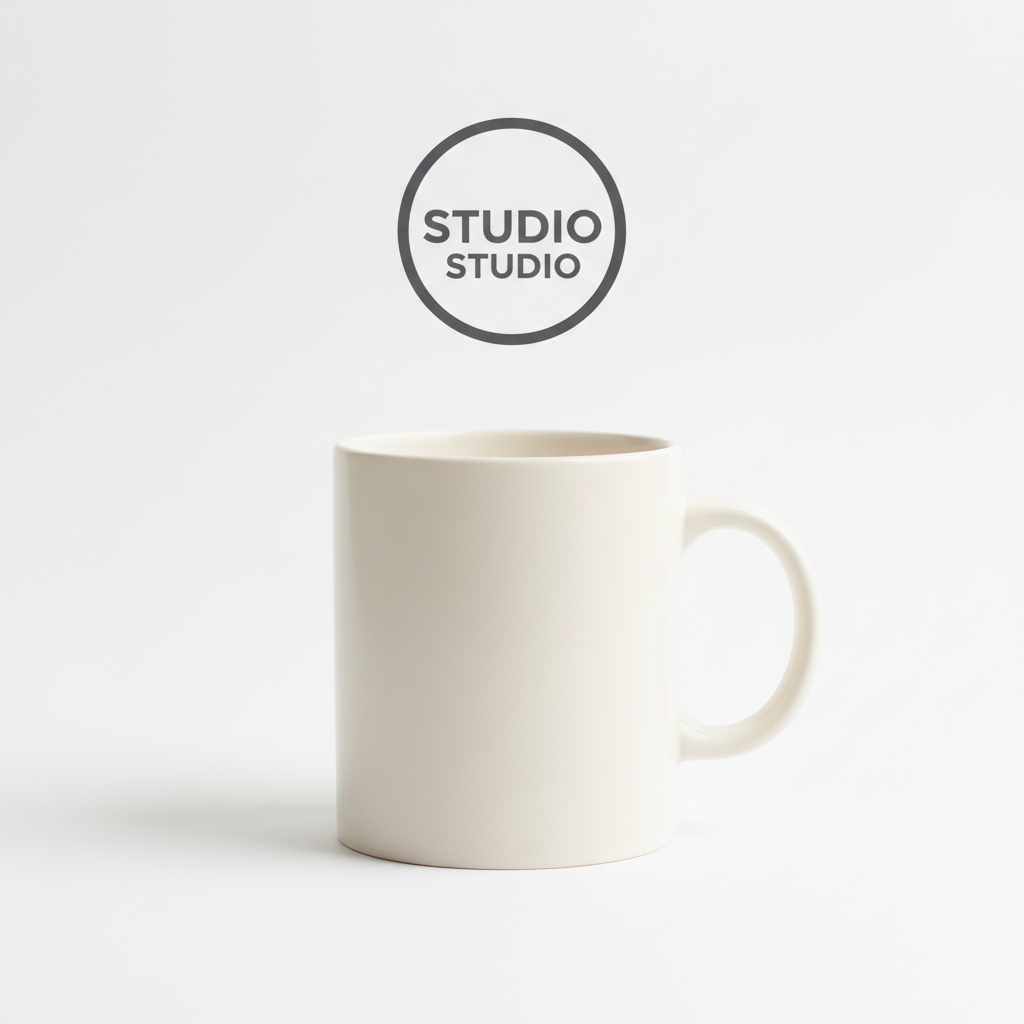
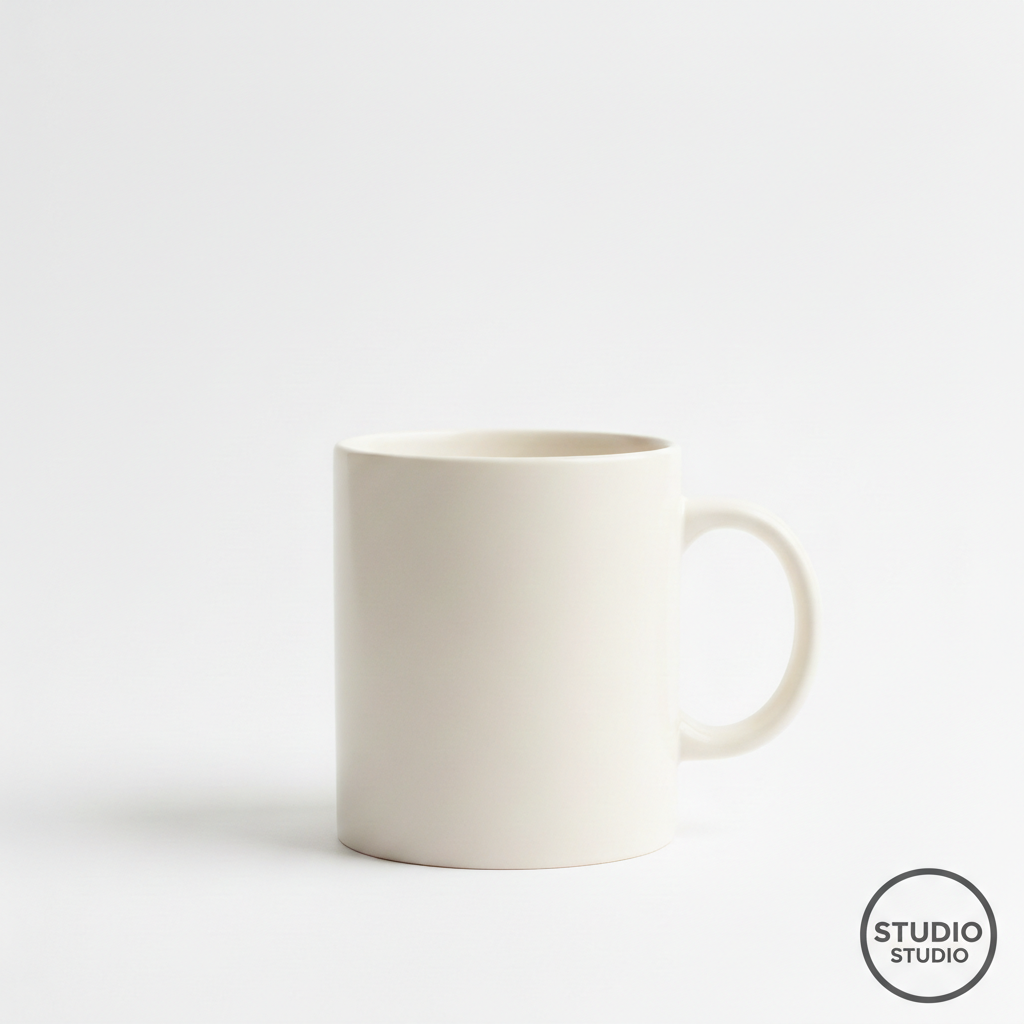
Logo watermark on product photo

Business logo overlaid on a product photo in the corner. Creates a subtle brand presence without distracting from the product.

Prompt: overlay the logo in the bottom right corner, sized to about 15% of the image width with slight transparency
Portrait photo and decorative frame as separate images
Before
->
Portrait with elegant frame overlay applied
After

Decorative frame around portrait

Ornate frame overlay placed around a portrait photo, creating an elegant framed look without manual layer alignment.

Prompt: place the decorative frame overlay around the entire photo, fitting it perfectly to the edges with the portrait visible through the center
Product photo and sale badge as separate images
Before
->
Product photo with sale badge overlay in corner
After

Sale badge on clothing item

Promotional sale badge overlaid on a clothing product photo at an eye-catching angle for e-commerce use.

Prompt: overlay the sale badge in the top right corner at a slight angle, making it prominent and eye-catching
Advertisement

If something looks off

AI changed the wrong area or something I didn't want changed

Why: The AI couldn't determine exactly where you wanted the overlay placed. This happens when position descriptions are ambiguous.

Try: Tap a marker on the exact spot where you want the overlay, then regenerate with the same prompt

Tip: Markers tell the AI 'I mean THIS spot specifically.' Use them when you need precise positioning.

Overlay is the wrong size

Why: Without specific size guidance, the AI makes assumptions about how big the overlay should be relative to the background.

Try: overlay the logo at 10% of the image width, or: make the overlay twice as large as before

Tip: Use percentages (10%, 20%, 50%) or relative terms (twice as large, half the size) for size control.

Overlay has unwanted background visible

Why: The overlay image had a non-transparent background that the AI included. This commonly happens with JPG files or images with white backgrounds.

Try: overlay just the logo/element without its background, remove the white background from the overlay

Tip: For cleanest results, use PNG images with transparent backgrounds. The AI can often remove backgrounds but it's not guaranteed.

Overlay is in the wrong position

Why: The AI interpreted your position description differently than you intended. 'Bottom right' can mean different things at different scales.

Try: move the overlay to the exact bottom right corner with a small margin from the edges

Tip: Add 'with margin' or 'with padding' to keep overlays from touching the very edge of your photo.

Overlay is too transparent or not transparent enough

Why: The default transparency might not match your needs, especially for watermarks or artistic overlays.

Try: set the overlay to exactly 50% opacity, or: make the overlay fully opaque with no transparency

Tip: Specify exact opacity percentages: 20% for subtle watermarks, 80-100% for prominent logos.

Quick answers

Do I need to use layers or masking to overlay photos?

No. Just describe where and how you want the overlay placed: 'put the logo in the bottom right corner' or 'place the frame around the photo.' The AI handles positioning, sizing, and transparency automatically. Markers are only needed if you want to specify an exact pixel position.

How do I overlay one photo on top of another for free?

Upload your background photo to EditThisPic, click the reference image button to add your overlay image, then describe the placement: 'overlay in the top left corner at 20% size.' The AI positions it in 20-40 seconds. No account, no login, no watermarks. Works with logos, frames, stickers, and any image.

Is there a free photo overlay tool that doesn't need an account?

Yes. EditThisPic overlays photos without requiring signup or login. Upload both images, describe where you want the overlay, and download your result. No watermarks. Works directly in your browser without installing any software.

Can I add a logo to multiple product photos?

Yes. Process each photo individually with the same prompt like 'overlay logo in bottom right at 15% width.' The AI applies consistent positioning across photos. For batch processing, just repeat the workflow for each product photo.

What file format works best for overlays?

PNG with a transparent background works best for clean overlays. However, the AI can often remove backgrounds from JPG overlays automatically. Just describe 'overlay just the logo without its background' if you need the AI to isolate the element.

Ready to overlay your photos?

Free to try. No signup required.

Try it free โ†’