Free • No signup Whiten Teeth · Free

AI Teeth Whitener

Describe the whitening you want and AI brightens your smile instantly. No marking needed.

Woman smiling with visibly yellow-stained teeth
Before
Same woman with naturally white, bright teeth
After

AI Teeth Whitener

Drop your photo here

or click to browse

Release to upload

Free • No signup

Advertisement
Popular use cases:
  • teeth whitening photo
  • smile enhancement
  • wedding photo smile
  • professional headshot smile
  • dating profile teeth
  • selfie teeth whitening
  • group photo smile fix
  • portrait smile correction

Cost
Free No signup required
Time
Instant results in 15-30 seconds
Works on
Any device - browser, phone, tablet, desktop
Powered by
AI-powered photo editing
Scenario Prompt Time
Subtle brightening gently brighten the teeth a few shades 25s
Natural whitening whiten teeth to a natural bright white 30s
Hollywood-white smile whiten teeth to bright Hollywood-white, even and uniform 35s

How it works

  1. Upload your photo

    Drop your image into EditThisPic. JPG, PNG, WebP up to 7MB. Photos where teeth are visible in a smile work best. The clearer the smile, the better the whitening result.

    Expect: Standard teeth whitening: 25-35 seconds. Group photos with multiple smiles: 40-50 seconds and may need refinements.
  2. Describe the whitening you want

    Type what you want: 'whiten the teeth to a natural bright white' or 'brighten the teeth while keeping them realistic.' Specify how white you want—natural, bright, or Hollywood white. No marking needed—the AI knows exactly where teeth are.

    Tip: Use 'natural white' for subtle improvement or 'bright white' for more dramatic results. Avoid 'pure white' unless you want an obviously edited look.

    Copy one of these to get started:

    Natural teeth whitening whiten the teeth to a natural bright white while keeping the smile realistic and not overdone
    Bright Hollywood smile whiten the teeth to a bright Hollywood-white smile, even and uniform across all visible teeth
    Subtle coffee stain removal remove the yellowish coffee stains from the teeth and restore them to their natural clean white color
    Group photo teeth whitening whiten the teeth of everyone smiling in this group photo, make all smiles look naturally bright and consistent
    3 more prompts
    Gentle brightening for selfie gently brighten the teeth in this selfie by a few shades, keeping it subtle enough to look unedited
    Wedding photo smile enhancement whiten the teeth in this wedding photo to a clean, radiant white that matches the formal setting
    Fix uneven tooth color even out the tooth color so all teeth are the same shade of white, fix any discolored individual teeth
  3. Review the result

    Check that teeth look evenly whitened and natural. Zoom in to verify the whitening doesn't bleed onto lips or gums. Ensure the brightness matches the overall photo lighting.

  4. Refine with markers if needed

    If specific teeth need more whitening or the whitening affected the lips or gums, tap markers on the exact spots and regenerate. Most teeth whitening works perfectly on the first try.

    Tip: Markers are for precision refinement only. Try without them first—you usually won't need them.
Try it free

AI Teeth Whitener

Drop your photo here

or click to browse

Release to upload

Free • No signup

"I whitened teeth in all my vacation photos before sharing with family. Took 30 seconds each and nobody could tell they were edited. The results look completely natural." @TravelSnaps_Jess

See it in action

Woman smiling with visibly yellow-stained teeth
Before
->
Same woman with naturally white, bright teeth
After

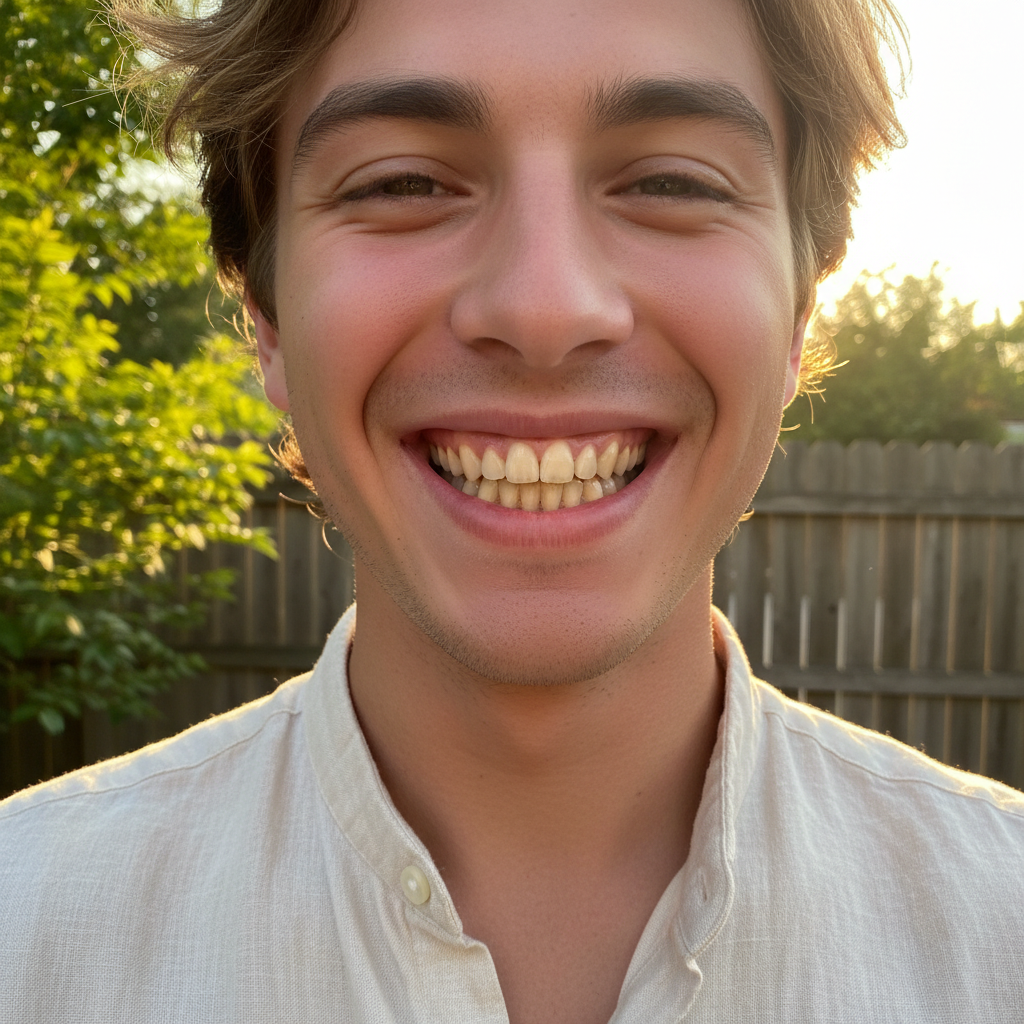
Coffee-stained smile brightened naturally

A portrait with visibly yellow-stained teeth transformed into a clean, naturally white smile.

Prompt: whiten the teeth to a natural bright white while keeping the smile realistic and not overdone
Man in suit with dull yellowish teeth
Before
->
Same man with bright white professional smile
After

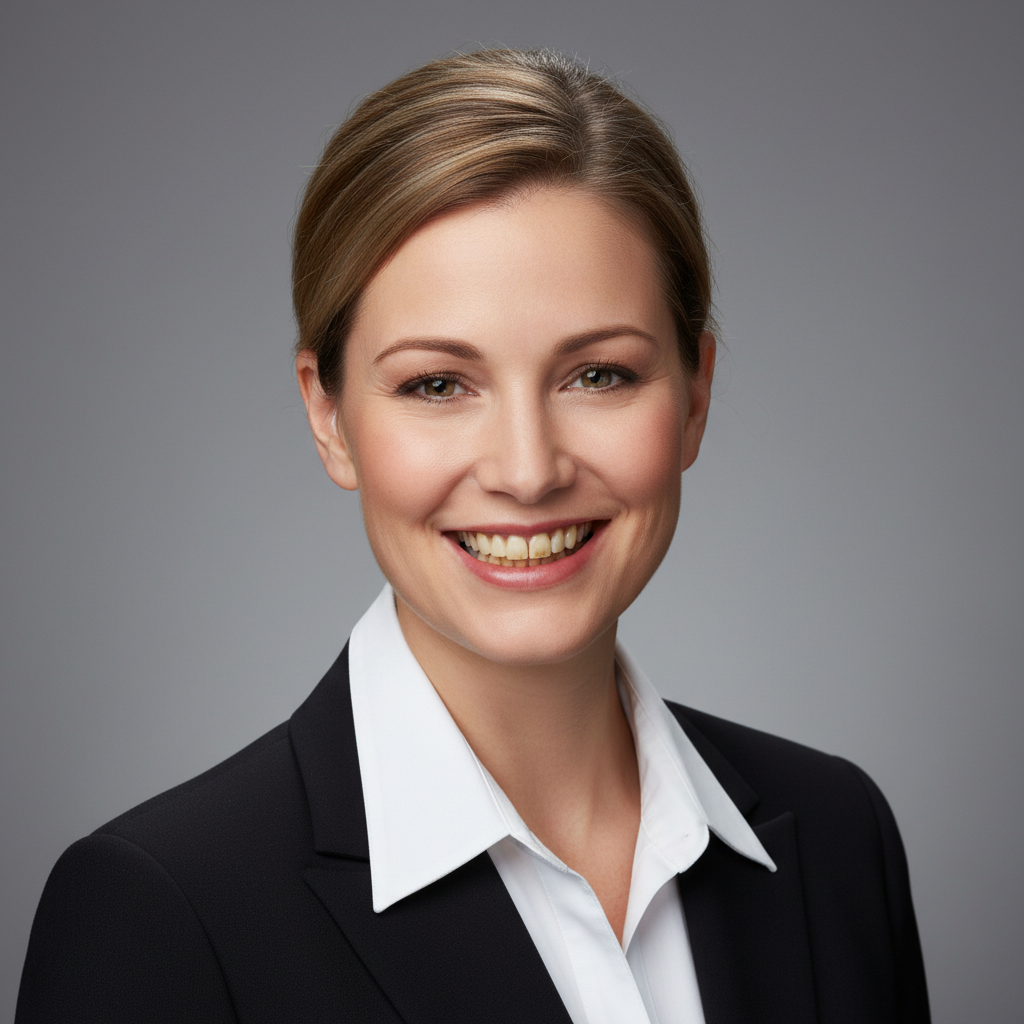
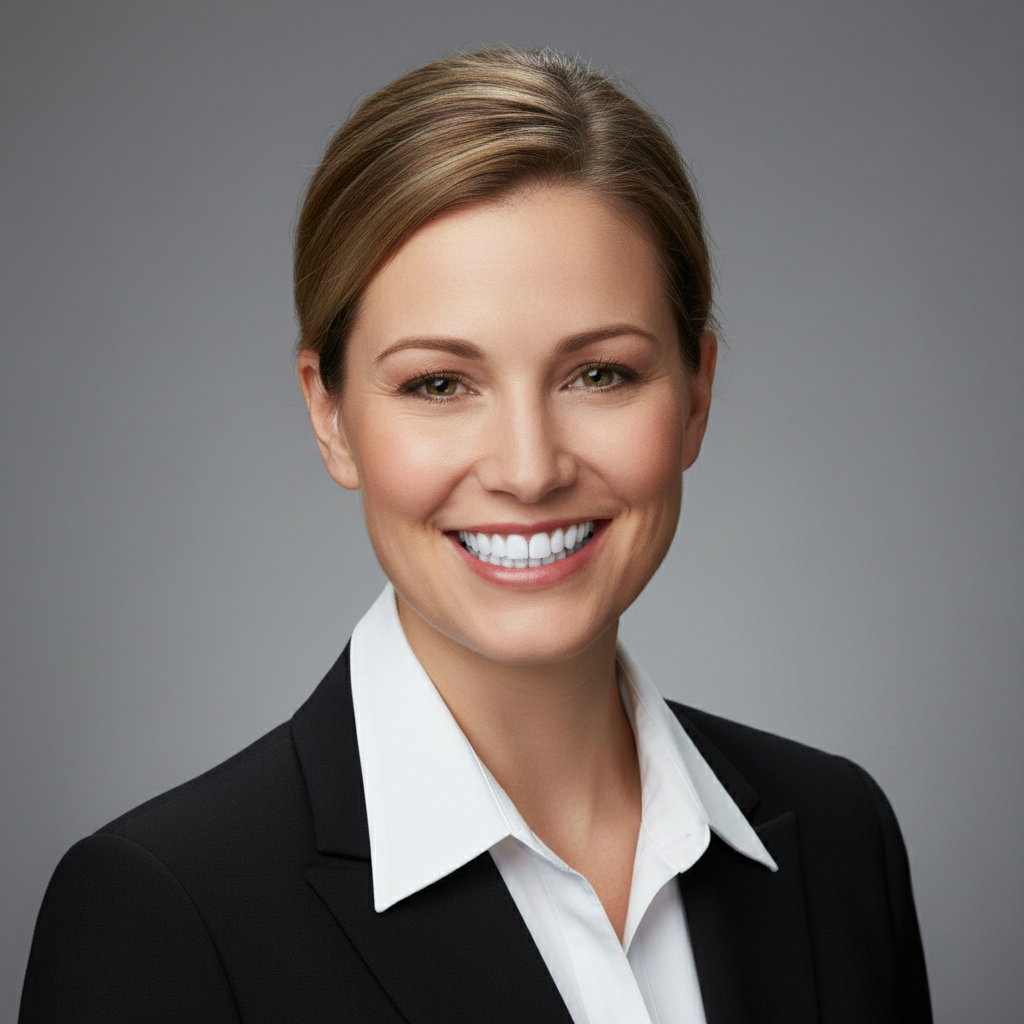
Professional headshot smile polished

A headshot with dull teeth enhanced to a bright, confident smile for professional use.

Prompt: whiten the teeth to a bright clean white, even and uniform for a professional headshot
Advertisement

If something looks off

AI changed the wrong area or something I didn't want changed

Why: The AI couldn't determine exactly which area you meant from description alone. This happens when lips or gums are close in color to the teeth.

Try: Tap a marker on the teeth specifically, then regenerate: whiten only the teeth, do not change lips or gums

Tip: Markers tell the AI 'I mean THIS area specifically.' Use them when description alone is ambiguous.

Teeth look unnaturally bright or glowing

Why: The whitening was too aggressive, making teeth brighter than anything else in the photo and creating an obvious edit.

Try: whiten the teeth subtly to a natural shade of white that matches the photo's lighting, not too bright

Tip: Adding 'match the photo's lighting' ensures teeth brightness is consistent with the overall scene.

Whitening bled onto lips or gums

Why: The AI couldn't precisely separate teeth edges from surrounding tissue, especially with teeth that are partially covered by lips.

Try: whiten only the tooth enamel surfaces, keep lips, gums, and tongue their original color exactly

Tip: Specifying 'tooth enamel surfaces only' gives the AI precise boundaries for the whitening.

Some teeth are whiter than others after editing

Why: Teeth at different angles catch light differently, causing the AI to apply uneven whitening across the smile.

Try: whiten all visible teeth to the same consistent shade of bright white, even coverage across the entire smile

Tip: Adding 'same consistent shade' and 'even coverage' addresses individual tooth variation.

Teeth look flat or lost their natural translucency

Why: Heavy whitening removed the subtle light variations that make teeth look three-dimensional and real.

Try: whiten the teeth while keeping their natural translucency, depth, and subtle light variations

Tip: 'Natural translucency' tells the AI to preserve the 3D quality of real teeth instead of painting them flat white.

Quick answers

Do I need to mark the teeth before describing the whitening I want?

No! Just describe what you want: 'whiten the teeth to a natural bright white.' The AI automatically identifies teeth in the photo and applies whitening. Only use markers if the whitening accidentally affects lips or gums and you need to be more precise.

How do I whiten teeth in a photo without it looking obviously edited?

Use 'natural' or 'subtle' in your prompt: 'whiten the teeth naturally by a few shades.' Avoid asking for 'pure white' or 'bleached.' The AI applies graduated whitening that preserves tooth translucency and matches the photo's lighting, so the result looks like naturally white teeth.

Is there a free AI teeth whitener that doesn't require login?

Yes, EditThisPic is free to try with no account needed. Upload your photo, describe the teeth whitening you want, and download the result. No watermarks on outputs. Works for subtle brightening to dramatic whitening without any signup.

What's the best free tool for whitening teeth in photos?

EditThisPic offers free AI teeth whitening with no signup required. Unlike apps that need you to paint over each tooth with a brush, just describe the whitening level you want. It handles single portraits and group photos, producing natural results in seconds.

Ready to brighten your smile?

Free to try. No signup required.

Try it free