Free • No signup Enhance Low-light photo · Free

AI Low Light Enhancer

Describe what to brighten and AI rescues your dark photo instantly. No exposure sliders to adjust.

Extremely dark restaurant photo with barely visible faces
Before
Same restaurant photo brightened with clear faces and warm ambiance
After

AI Low Light Enhancer

Drop your photo here

or click to browse

Release to upload

Free • No signup

Advertisement
Popular use cases:
  • dark photo fix
  • low-light photo enhancement
  • night photography improvement
  • indoor photo brightening
  • backlit photo correction
  • underexposed photo recovery
  • concert photo fix
  • restaurant photo brightening

Cost
Free No signup required
Time
Instant results in 15-30 seconds
Works on
Any device - browser, phone, tablet, desktop
Powered by
AI-powered photo editing
Scenario Prompt Time
General dark photo fix brighten, lift shadows, reduce noise 20s
Backlit subject rescue brighten face without blowing out background 30s
Extreme darkness recovery maximize brightness, recover all detail, reduce noise 40s

How it works

  1. Upload your photo

    Drop your dark image into EditThisPic. JPG, PNG, WebP up to 7MB. Even extremely dark photos work—the AI can recover detail that's invisible to your eye.

    Expect: Standard brightening: 20-30 seconds. Extreme low-light with noise reduction: 30-45 seconds and may need refinements.
  2. Describe the enhancement you want

    Type what you need: 'brighten this dark photo and recover the details' or 'fix the low light, reduce noise, and make the subject visible.' Be specific about what matters—faces, background, or the whole scene. No exposure sliders needed—the AI understands 'dark' and 'brighten.'

    Tip: Add 'reduce noise' to your prompt if the photo was taken at high ISO—the AI handles noise cleanup alongside brightening.

    Copy one of these to get started:

    General dark photo fix brighten this dark photo, lift the shadows, recover hidden details, and reduce noise
    Backlit subject rescue brighten the person's face and body in this backlit photo without blowing out the bright background
    Nighttime outdoor shot enhance this nighttime photo, make the scene brighter and visible while keeping the night atmosphere
    Indoor low-light portrait brighten this indoor portrait, improve the skin tones, and reduce the grain from low-light shooting
    3 more prompts
    Concert or event photo brighten this concert photo, make the performers visible while keeping the dramatic stage lighting
    Sunset or dusk shot rescue brighten the foreground of this sunset photo so the subject is visible, keep the sky colors as they are
    Extremely dark photo recovery maximize brightness and recover all possible detail from this very dark photo, reduce noise aggressively
  3. Review the enhancement

    Check that shadows are lifted without washing out highlights. Zoom in on faces and details—they should be clear and natural. Verify that noise hasn't been amplified in the brightened areas.

  4. Refine with markers if needed

    If only certain areas need more brightening—like a face in shadow while the background is already fine—tap markers on the dark spots and describe the targeted fix. Most low-light fixes work well on the first try.

    Tip: Markers are for precision refinement only. Try without them first—you usually won't need them.
Try it free

AI Low Light Enhancer

Drop your photo here

or click to browse

Release to upload

Free • No signup

"Took photos at a dimly lit restaurant and they were all basically black. Typed 'brighten and remove noise' and I can actually see everyone's faces now. Saved my anniversary dinner photos." @NightOwl_Photography
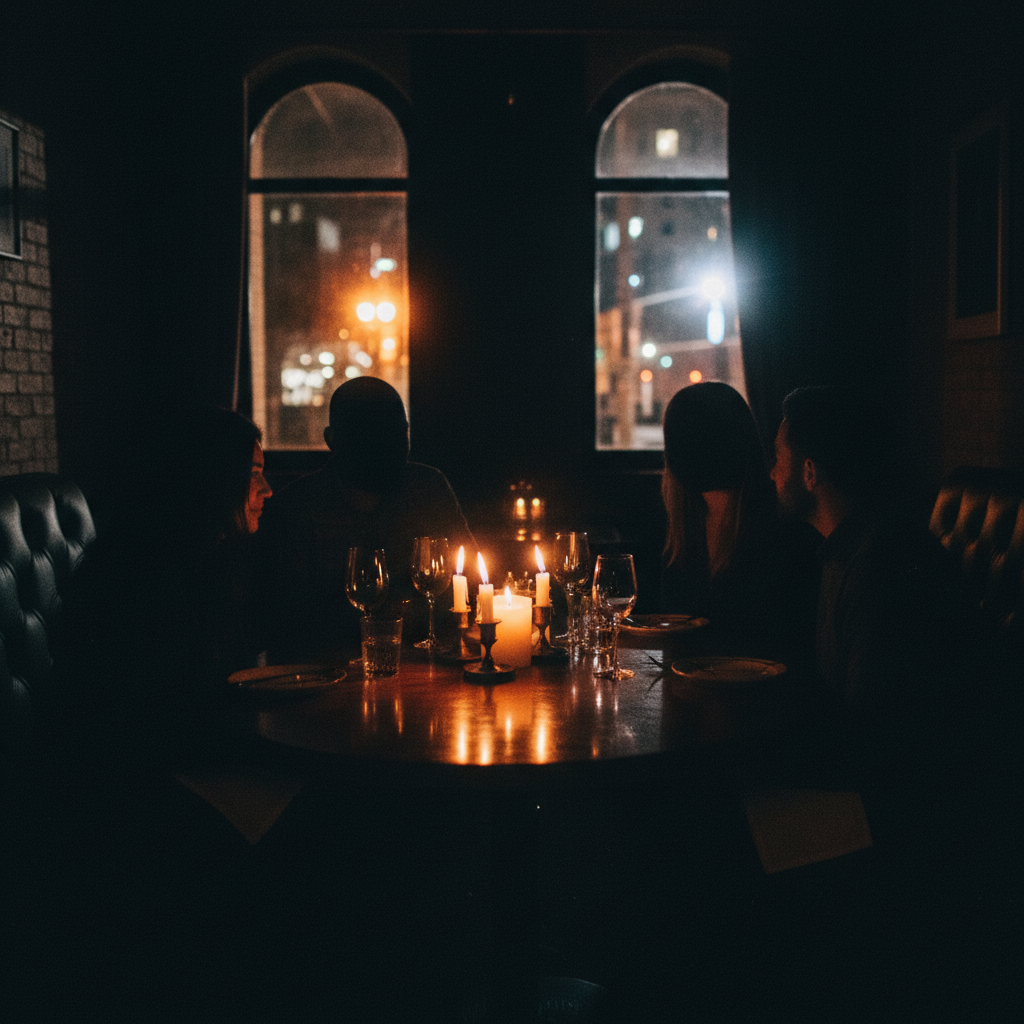
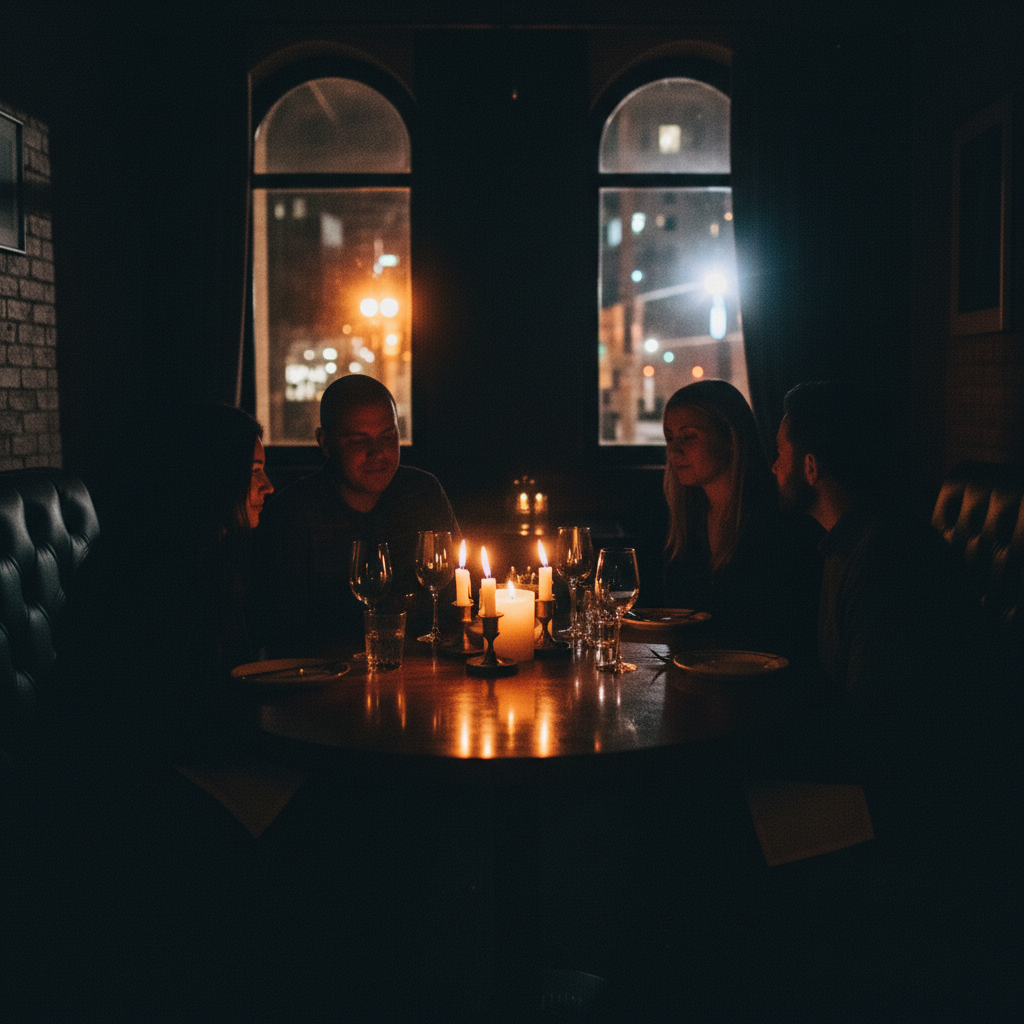
See it in action

Extremely dark restaurant photo with barely visible faces
Before
->
Same restaurant photo brightened with clear faces and warm ambiance
After

Restaurant photo rescued from darkness

A nearly black indoor restaurant photo brightened to reveal clear faces and warm ambiance.

Prompt: brighten this dark photo, lift the shadows, recover hidden details, and reduce noise
Backlit silhouette of person against bright window
Before
->
Same photo with person's face clearly visible and window properly exposed
After

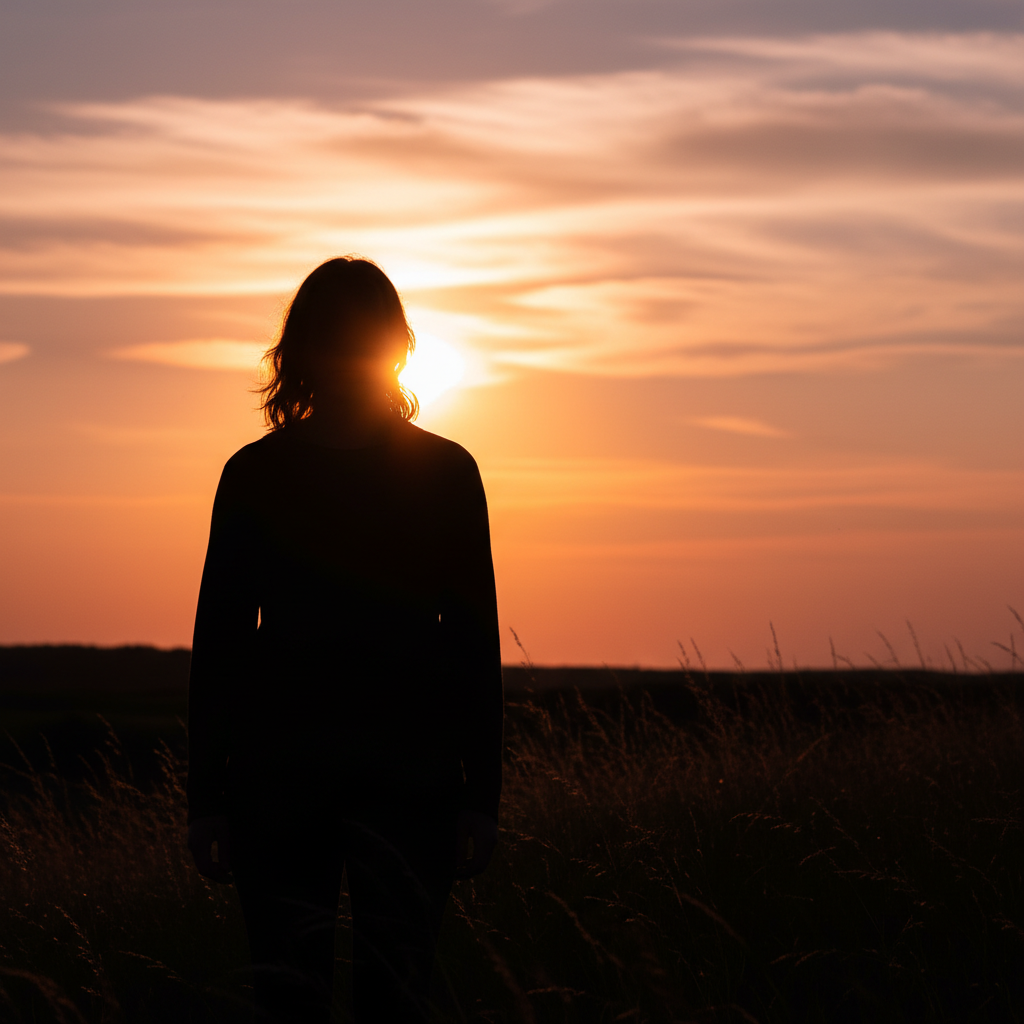
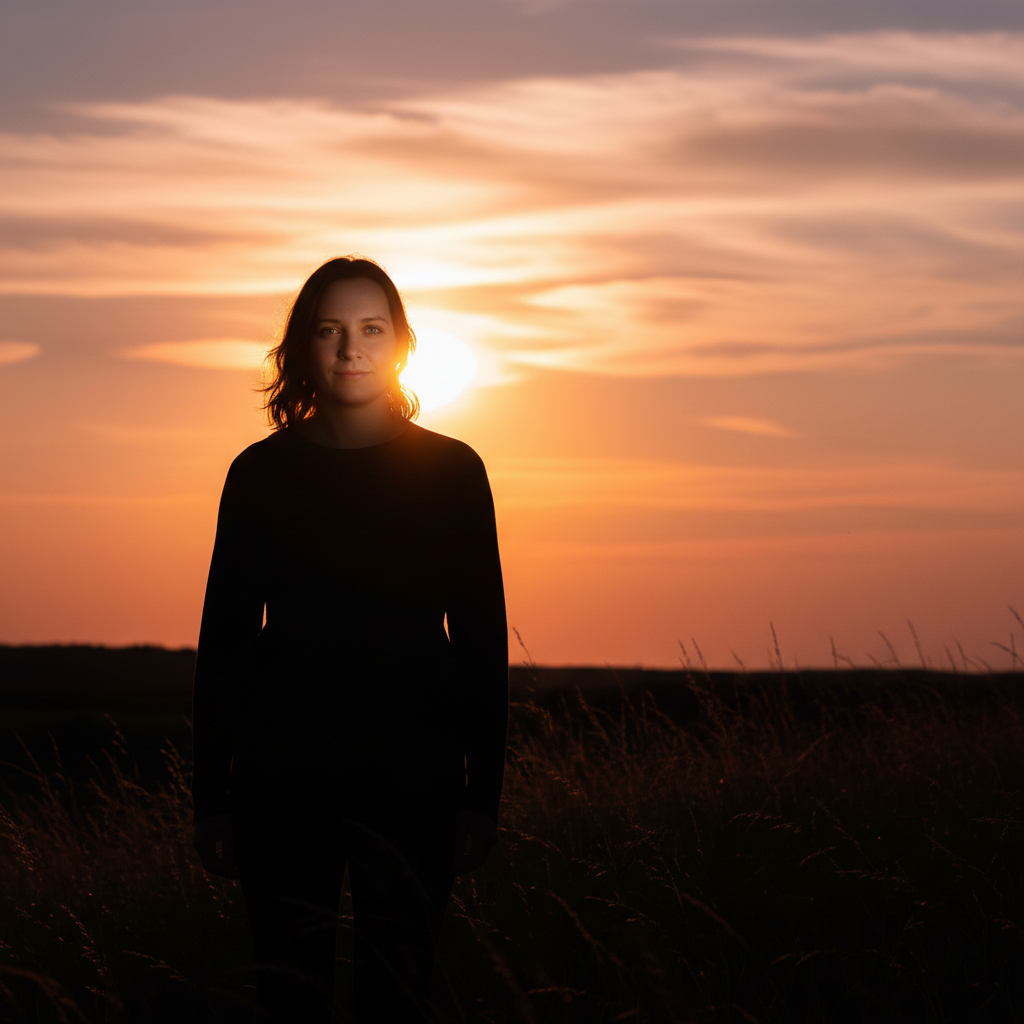
Backlit portrait fixed

A person photographed against a bright window, face completely in shadow, rescued with targeted brightening.

Prompt: brighten the person's face and body in this backlit photo without blowing out the bright background
Advertisement

If something looks off

AI changed the wrong area or something I didn't want changed

Why: The AI couldn't determine which dark area you meant from description alone. This happens when some areas should stay dark (like shadows for mood) while others need brightening.

Try: Tap a marker on the specific dark area you want brightened, then regenerate with the same prompt

Tip: Markers tell the AI 'I mean THIS area specifically.' Use them when you want selective brightening.

Brightened photo looks washed out or flat

Why: Lifting all shadows equally removes contrast, making the image look flat. This happens when the AI over-brightens uniformly.

Try: brighten the dark areas of this photo but maintain strong contrast and keep deep shadows where they're natural

Tip: 'Maintain strong contrast' tells the AI to brighten selectively rather than flattening the entire tonal range.

Noise and grain got worse after brightening

Why: Brightening amplifies existing noise that was hidden in dark areas. High-ISO photos are especially prone to this.

Try: brighten this photo and reduce the noise and grain aggressively, keep details sharp but smooth out the grainy texture

Tip: Always include 'reduce noise' when brightening low-light photos—it's the most common side effect.

Highlights are blown out after brightening

Why: The AI brightened everything including already-bright areas, pushing highlights beyond recoverable range.

Try: brighten only the dark shadows in this photo, leave the highlights and bright areas exactly as they are

Tip: 'Leave highlights as they are' restricts brightening to only the shadow regions, protecting existing bright areas.

Colors look off or have a strange tint after brightening

Why: Artificial lighting (fluorescent, tungsten, mixed) creates color casts that become more visible when shadows are lifted.

Try: brighten this photo and correct the white balance to look natural, remove any color cast from artificial lighting

Tip: Add 'correct white balance' to your brightening prompt when indoor photos show yellow, green, or blue tints.

Quick answers

Do I need to select the dark areas before describing what to fix?

No! Just type 'brighten this dark photo' and the AI identifies and fixes underexposed areas automatically. Only use markers if you want selective brightening—like brightening a face while keeping a moody dark background.

How do I fix a dark photo taken in low light for free?

Upload your dark photo to EditThisPic and type 'brighten this photo, lift shadows, and reduce noise.' The AI brightens underexposed areas, recovers hidden details, and cleans up noise in 20-30 seconds. Works on nighttime, indoor, and backlit photos. Free to use, no account required.

Is there a free AI low-light photo enhancer that doesn't require login?

Yes, EditThisPic fixes dark photos for free with no account needed. Upload your underexposed image, describe the fix, and download the brightened result. No watermarks on outputs. Handles extreme darkness, backlighting, and indoor low-light situations.

Can AI recover details from an extremely dark photo?

Yes! Even photos that look nearly black often have hidden detail the AI can recover. Upload your darkest photo and type 'maximize brightness and recover all possible detail.' The results depend on how much data the camera sensor captured—RAW files recover more than heavily compressed JPEGs.

Ready to rescue your dark photos?

Free to try. No signup required.

Try it free