Free • No signup Open Editor

Fix Torn Photo

Repair rips, tears, and missing sections in seconds with AI.

Type 'repair the tear and restore the missing section' and EditThisPic's AI reconstructs the damaged area in 20-40 seconds. Works on corner tears, center rips, and photos torn in half. The AI infers what was in the missing area based on surrounding content and image context. No marking needed for obvious tears. Free to try, no account needed.

Graduation photo with torn and missing corner
Before
Complete graduation photo with corner reconstructed
After

How it works

1

Upload your torn photo

Drop your image into EditThisPic. JPG, PNG, WebP up to 7MB. If the photo is in pieces, scan them together arranged as closely as possible. The AI works best when it can see both sides of the tear.

⏱ Small corner tears: 20-30 seconds. Major tears or missing sections: may need 3-4 refinements for best results.
2

Describe the repair you need

Type your instruction: 'repair the tear and restore the photo' or 'reconstruct the missing corner and fix the rip.' Describe what was torn if you know—'repair the tear through the face' or 'restore the missing background.' No marking needed for visible tears.

💡 If you know what was in the missing section, mention it: 'the torn area should show continuation of the garden background' helps the AI reconstruct accurately.

Copy one of these to get started:

General tear repair repair the tear and restore the photo to complete condition, seamlessly blend the repaired area
Missing corner reconstruction reconstruct the missing corner, extend the background naturally to complete the image
Tear through a face repair the tear across the face, carefully reconstruct the facial features to look natural
Photo torn in pieces merge these photo pieces together, repair the torn edges and blend them seamlessly
3 more prompts
Edge rip or border damage repair the torn edges of this photo and reconstruct the missing border areas
Tear with missing subject repair the tear, the missing section contained part of a person standing next to the visible subject
Old photo with creases and tears repair all the tears and creases, smooth out the fold lines and restore the damaged sections
3

Review the reconstruction

Check the repaired area for seamless blending. Look for consistent lighting, matching colors, and natural continuation of patterns. If faces were torn, verify the reconstruction looks natural.

4

Refine the repair if needed

If the reconstruction doesn't look right or edges are visible, tap markers on specific areas and regenerate with guidance. For torn faces, provide details about what should be there. Most repairs work well on the first try.

💡 For photos torn in half, do the basic repair first, then refine the seam area specifically with markers.
Try it free
"Found my parents' wedding photo torn in three pieces. Scanned the fragments and the AI stitched it back together perfectly. My mom was in tears." @FamilyHeirloom_Jenny

See it in action

Graduation photo with torn and missing corner
Before
Complete graduation photo with corner reconstructed
After

Corner tear on graduation photo repaired

Storage damage had torn off the corner of this 1990s graduation portrait. The AI reconstructed the missing background seamlessly.

Prompt: reconstruct the missing corner, extend the background naturally to complete the image
Beach family photo torn in half vertically
Before
Complete beach photo with tear invisibly repaired
After

Family photo ripped through center fixed

A straight tear had split this family vacation photo. The AI merged the pieces and made the seam invisible.

Prompt: repair the tear and restore the photo to complete condition, seamlessly blend the repaired area
Wedding photo with decorative border torn off left side
Before
Complete wedding photo with border reconstructed
After

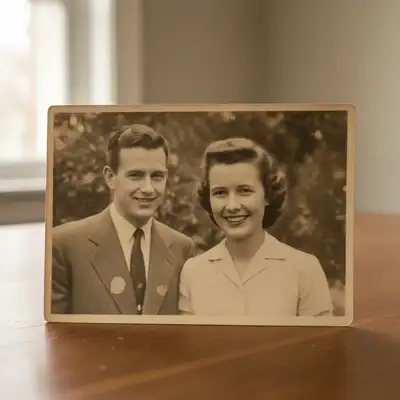
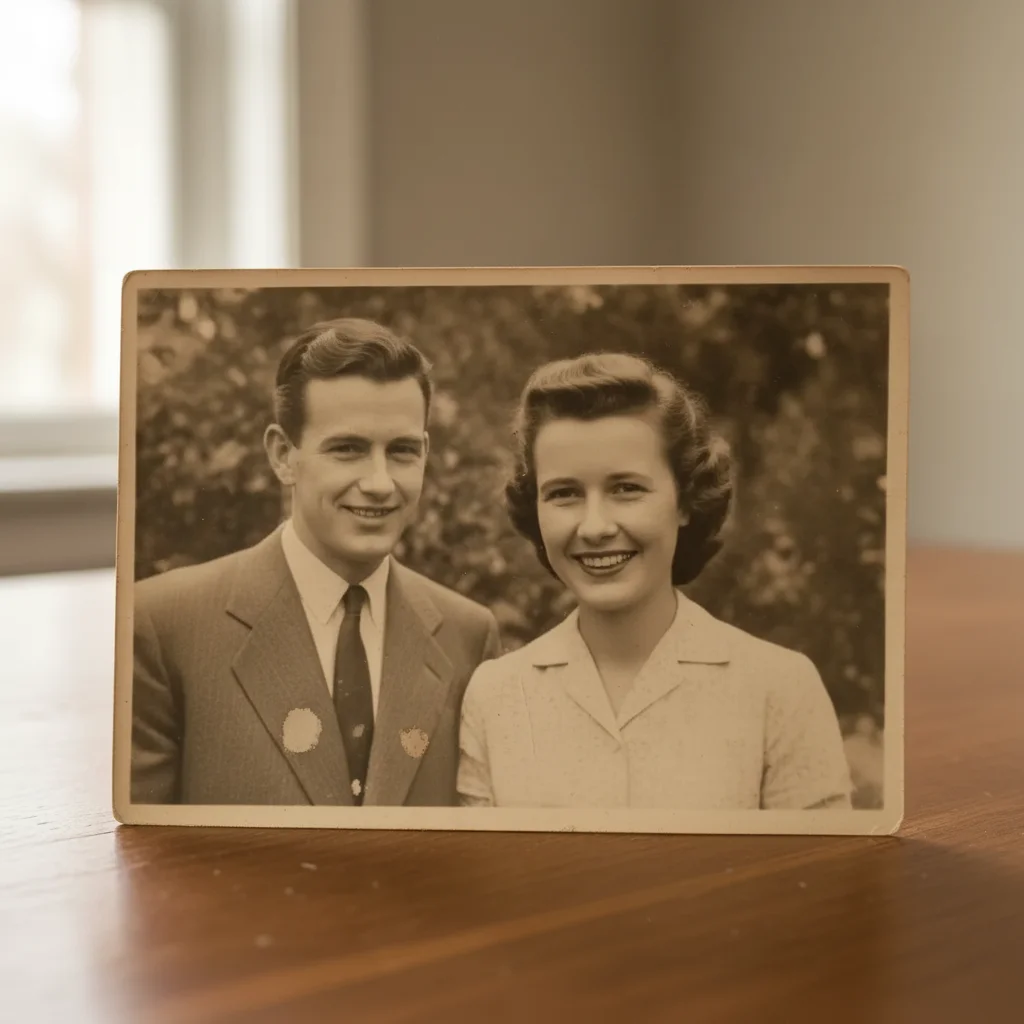
Wedding photo with torn edge restored

The decorative border had been torn from one side. The AI extended the pattern to complete the frame.

Prompt: repair the torn edges of this photo and reconstruct the missing border areas

If something looks off

Reconstructed area looks wrong or unrealistic

Why: The AI inferred incorrectly what was in the missing section. Without enough context, reconstructions may not match expectations.

Try: repair the tear, the missing area should contain [describe what you know was there]

💡 Any details about the missing content help: 'should show more of the garden' or 'was a plain wall' guides reconstruction.

Seam line is still visible after repair

Why: Color or lighting differences between sides of the tear weren't fully blended by the AI.

Try: blend the repair seam more naturally, match the colors and lighting on both sides

💡 Tap markers along the visible seam line to show the AI exactly where blending needs improvement.

AI changed the wrong area or something I didn't want changed

Why: The AI couldn't determine exactly which area you meant from description alone. This happens with ambiguous requests.

Try: Tap a marker on the specific tear you want repaired, then regenerate with the same prompt

💡 Markers tell the AI 'I mean THIS tear specifically.' Use them when there are multiple damaged areas.

Reconstructed face doesn't match the person

Why: Faces require the most context to reconstruct accurately. The AI can only infer based on partial information.

Try: carefully repair the face, make the reconstruction match the visible portions of the person's features

💡 For faces, provide any reference: 'the person has glasses' or 'match the other photos of this person' if applicable.

Photo pieces didn't align properly

Why: When scanning torn pieces together, misalignment can confuse the AI about where the actual tear is.

Try: align and merge these photo fragments, correct any misalignment in the torn pieces

💡 When scanning fragments, try to align them as closely as possible before uploading.

Quick answers

Do I need to mark the tear before describing the repair?

No! For obvious tears, just describe what you want: 'repair the tear.' The AI recognizes tear patterns—the edges, color differences, and disruption to image content are distinctive. Only use markers when there are multiple damaged areas and you want to address them one at a time, or when the AI missed part of the damage.

Can AI repair a photo torn into multiple pieces?

Yes! Scan all the pieces together, arranged as closely as possible to their original positions. The AI can identify fragment edges and merge them, filling in any gaps. Works best when pieces are well-aligned and the gap between them is minimal. Large missing sections between fragments will be reconstructed based on context.

What if a face was in the torn-away section?

The AI can reconstruct faces, but results depend on how much information remains. If half a face is missing, expect a plausible but not perfect reconstruction—the AI cannot know exactly what the person looked like. For faces, do basic repair first, then refine with specific guidance about the person if you have that information.

How should I scan torn photo pieces?

Scan all pieces together on one scan, positioned as close to their original arrangement as possible. Keep gaps between pieces minimal. Ensure even lighting without shadows falling between fragments. Higher resolution helps the AI see fine details at tear edges.

Can tears and other damage be fixed at the same time?

Yes! Use a comprehensive prompt like 'repair the tears, remove scratches, and restore faded colors.' The AI handles multiple issues simultaneously. For complex photos with many problems, you might get better results addressing the tear first, then other damage in a second pass.

Ready to repair your torn photos?

Free to try. No signup required.

Try it free