Free • No signup Fix Background · Free

The background in your photo is too messy?

You look great—but that messy room behind you doesn't. Blur the clutter in seconds, or replace it with a clean background entirely.

Professional woman with messy unmade bed and laundry visible behind her
Before
Same woman with background heavily blurred—mess completely unrecognizable
After

The Background in Your Photo is Too Messy? Fix It in Seconds

Drop your photo here

or click to browse

Release to upload

Free • No signup

Advertisement
Popular use cases:
  • messy bedroom selfie
  • cluttered background
  • work from home photo
  • unmade bed visible
  • messy room behind me
  • embarrassing background
  • cluttered office photo
  • laundry in background
  • messy house selfie
  • hide mess in photo

Cost
Free No signup required
Time
Instant results in 15-30 seconds
Works on
Any device - browser, phone, tablet, desktop
Powered by
AI-powered photo editing
Scenario Prompt Time
Blur messy bedroom blur the background to hide the messy room 10s
Replace with white replace background with clean white studio 20s
Replace with gray replace background with soft gray gradient 20s

How it works

  1. Upload your photo with the messy background

    Upload a clear photo showing the area you want to edit. Good lighting and sharp focus help the AI deliver better background results. JPG, PNG, WebP up to 7MB.

    Expect: The AI focuses on what's behind you—not your appearance. Your face and outfit stay exactly the same, only the background changes.
  2. Choose: blur or replace

    Pick your fix strategy. To blur the mess: 'blur the background to hide the clutter'—this keeps the original setting recognizable but makes details impossible to see. To replace entirely: 'replace background with clean studio backdrop'—this swaps in a professional environment. Both hide the mess, blurring is faster and more natural for casual photos.

    Tip: For profile photos and professional use, replace with a clean background. For casual social posts where you want to keep the 'at home' vibe, blur instead.

    Copy one of these to get started:

    Hide messy bedroom (blur) blur the background to hide the messy room behind me
    Hide messy bedroom (replace) replace background with clean white studio backdrop, professional and simple
    Hide cluttered office/workspace blur the background to hide the cluttered desk and papers behind me
    Hide messy living room blur the background to hide the messy couch and clutter, keep me sharp
    3 more prompts
    Replace with professional gradient replace background with soft gray gradient studio backdrop, hide all the mess
    Replace with outdoor scene replace background with blurred park setting, green trees, natural lighting
    Blur with depth effect blur the messy background heavily like a professional portrait camera, keep me in sharp focus
  3. Review the result

    Check that the mess is truly hidden. For blurred backgrounds, zoom in to verify clutter isn't identifiable. For replaced backgrounds, check edge quality around your head and shoulders. Verify the background change looks natural.

  4. Refine edges if needed

    If some clutter still shows or edges look rough, tap markers on problem areas and regenerate. This is rare—most mess-hiding works perfectly on the first try. The AI is trained to detect 'background' from 'person' automatically.

    Tip: Markers help when you have objects between you and the messy background—like a chair back or plant that should stay sharp while the mess behind blurs.
Advertisement
Try it free

The Background in Your Photo is Too Messy? Fix It in Seconds

Drop your photo here

or click to browse

Release to upload

Free • No signup

"Saved me so many times. I take LinkedIn photos at home now and just blur out my bedroom behind me. Nobody needs to know I took it in my pajamas." @tech_recruiter_jess

See it in action

Professional woman with messy unmade bed and laundry visible behind her
Before
->
Same woman with background heavily blurred—mess completely unrecognizable
After

Messy bedroom blurred for LinkedIn photo

A professional selfie taken at home with unmade bed and laundry visible. The AI blurred the background to hide all the mess while keeping the subject sharp.

Prompt: blur the background to hide the messy room behind me
Professional man with extremely cluttered home office and mess visible behind him
Before
->
Same man with clean white studio background—all clutter replaced
After

Cluttered home office replaced with studio background

A work-from-home profile photo with cluttered desk, cables, and papers visible. The AI replaced the entire messy background with a clean studio backdrop.

Prompt: replace background with clean white studio backdrop, professional and simple
Smiling woman with messy couch and living room clutter visible behind her
Before
->
Same woman with background blurred—couch and mess unrecognizable soft blur
After

Messy living room blurred for dating app

A casual selfie with a messy couch and clutter visible behind the subject. The AI blurred the background to keep the home feel while hiding embarrassing mess.

Prompt: blur the background to hide the messy couch and clutter, keep me sharp

Detailed Guides by Scenario

📷

Photo Rescue & Restoration

Revive old, damaged, or poorly-shot photos with AI background — bring new life to images you thought were unsalvageable.

Common Scenarios

  • Applying background to old family photos that have degraded over time
  • Fixing a once-in-a-lifetime shot (wedding, graduation) that suffers from poor quality
  • Using background on scanned prints to get crisp digital versions

Best Practices

  • Scan old photos at the highest DPI your scanner supports before uploading for best results
  • Describe the specific issue — 'this photo is too dark and blurry' gives better background than a generic prompt
  • For severely damaged photos, work in stages: fix the biggest issue first, then refine
📷

Professional & Business Use

Ensure photos for websites, presentations, and marketing meet professional standards with background.

Common Scenarios

  • Using background on employee photos for a company website that need to look polished
  • Applying background to event photos before sharing in a client presentation
  • Improving product images with background for an online store or catalog

Best Practices

  • Process all images in a batch with the same enhancement settings for visual consistency
  • For web use, balance enhancement quality with file size — overly large images slow page loads
  • Always compare before and after to make sure background looks natural, not over-processed
📷

Social Media & Personal Sharing

Make your personal photos look their best before sharing with friends, family, or followers using background.

Common Scenarios

  • Quickly applying background to vacation photos before posting on social media
  • Using background on a selfie that has great composition but poor lighting
  • Batch-fixing a phone gallery of photos with background before creating an album to share

Best Practices

  • Start with the photo you'd most like to share — fix that one first and use the same approach on the rest
  • For selfies, subtle enhancement always beats heavy processing — keep it natural
  • If the photo was shot in low light, mention it in the prompt so the AI tailors background accordingly

If something looks off

Some clutter is still recognizable after blurring

Why: The blur intensity wasn't strong enough to fully hide identifiable objects in the background.

Try: blur the background much more heavily to completely hide the mess, make it unrecognizable

Tip: Use words like 'heavily,' 'strongly,' or 'completely' to increase blur intensity when mess is still visible.

The AI blurred me instead of just the background

Why: The AI couldn't clearly determine the boundary between subject and background, often with similar colors or complex edges.

Try: Tap markers on your face/body, then: keep me in sharp focus, only blur the messy background behind me

Tip: Markers on yourself tell the AI 'this is the subject, keep THIS sharp' very clearly.

Edge between me and blurred background looks harsh

Why: The transition from sharp subject to blurred background is too abrupt, creating an unnatural cutout look.

Try: blur the background naturally with smooth transition edges like a professional camera

Tip: Adding 'natural transition' or 'like a professional camera' creates more realistic bokeh-style blur.

New background looks fake or doesn't match lighting

Why: When replacing backgrounds, the new environment's lighting direction doesn't match the original photo.

Try: replace background with [your choice] matching the lighting on my face from [direction]

Tip: Look at where shadows fall on your face and specify that lighting direction in your prompt.

Something between me and the mess got blurred when it shouldn't

Why: An object closer to the camera (like a chair back or plant) is being treated as background when it should stay sharp.

Try: Tap markers on the object that should stay sharp, then: keep this sharp, only blur the mess behind it

Tip: Use markers to mark the boundary of what should stay in focus vs what should blur.

Quick answers

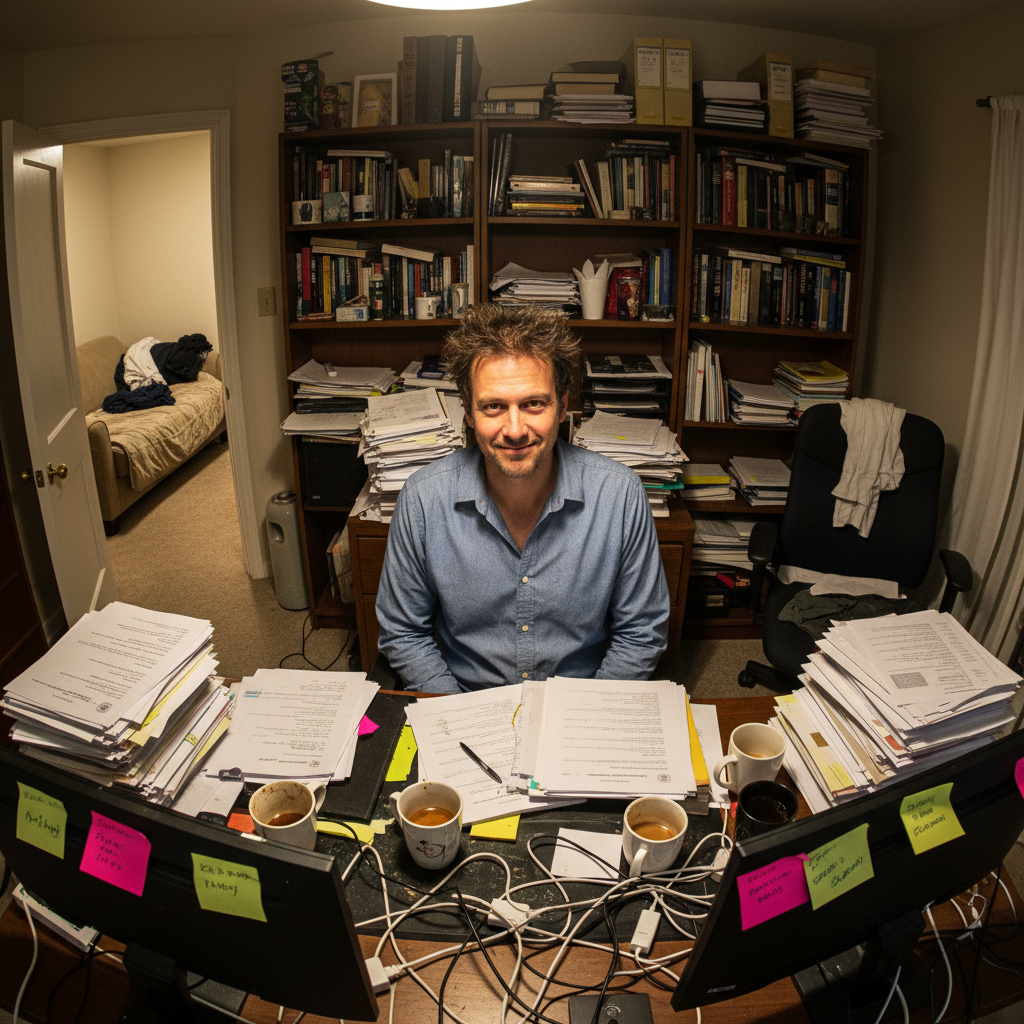
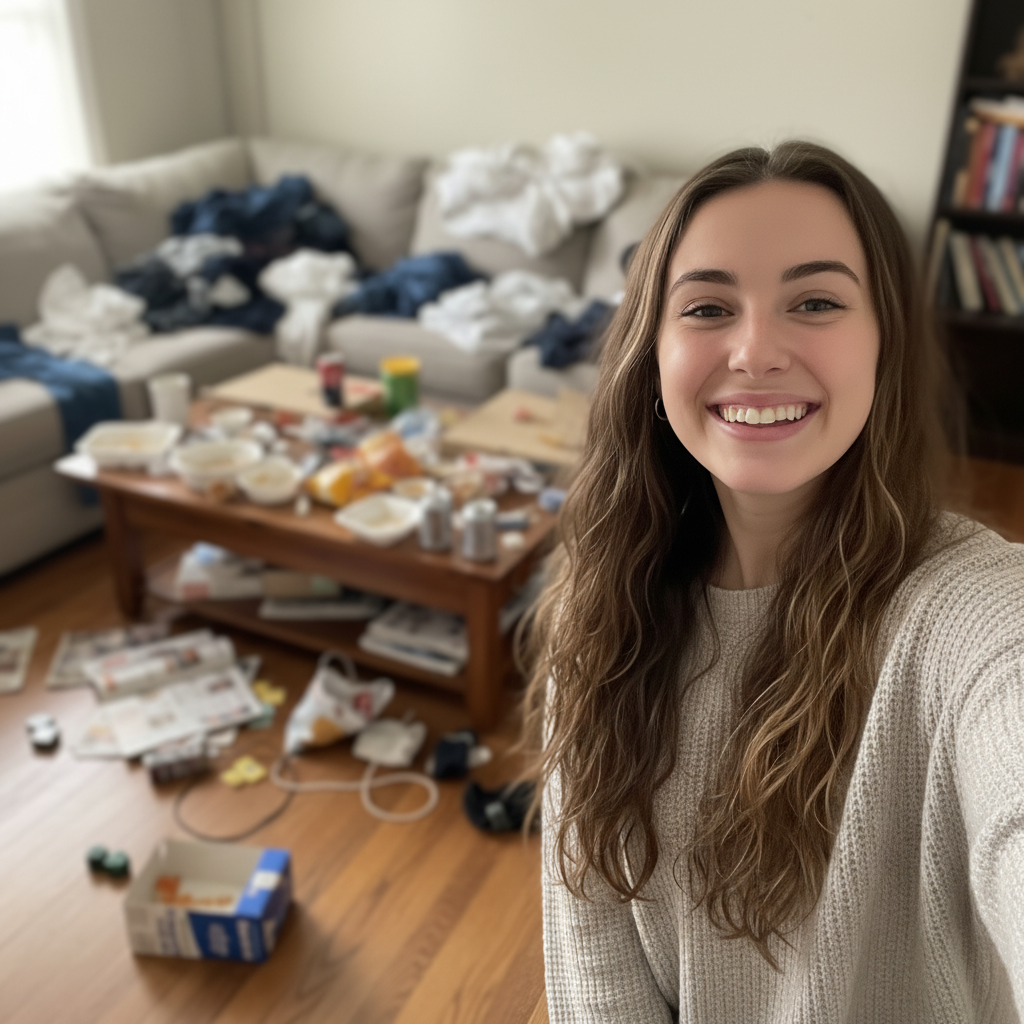
Do I need to clean my room before taking the photo?

No! That's the whole point. Take the photo exactly as you are—messy room, cluttered desk, laundry everywhere. Upload it to EditThisPic and blur or replace the background in seconds. The AI hides the mess so you don't have to physically clean anything. Your face and outfit stay perfect, only the background changes.

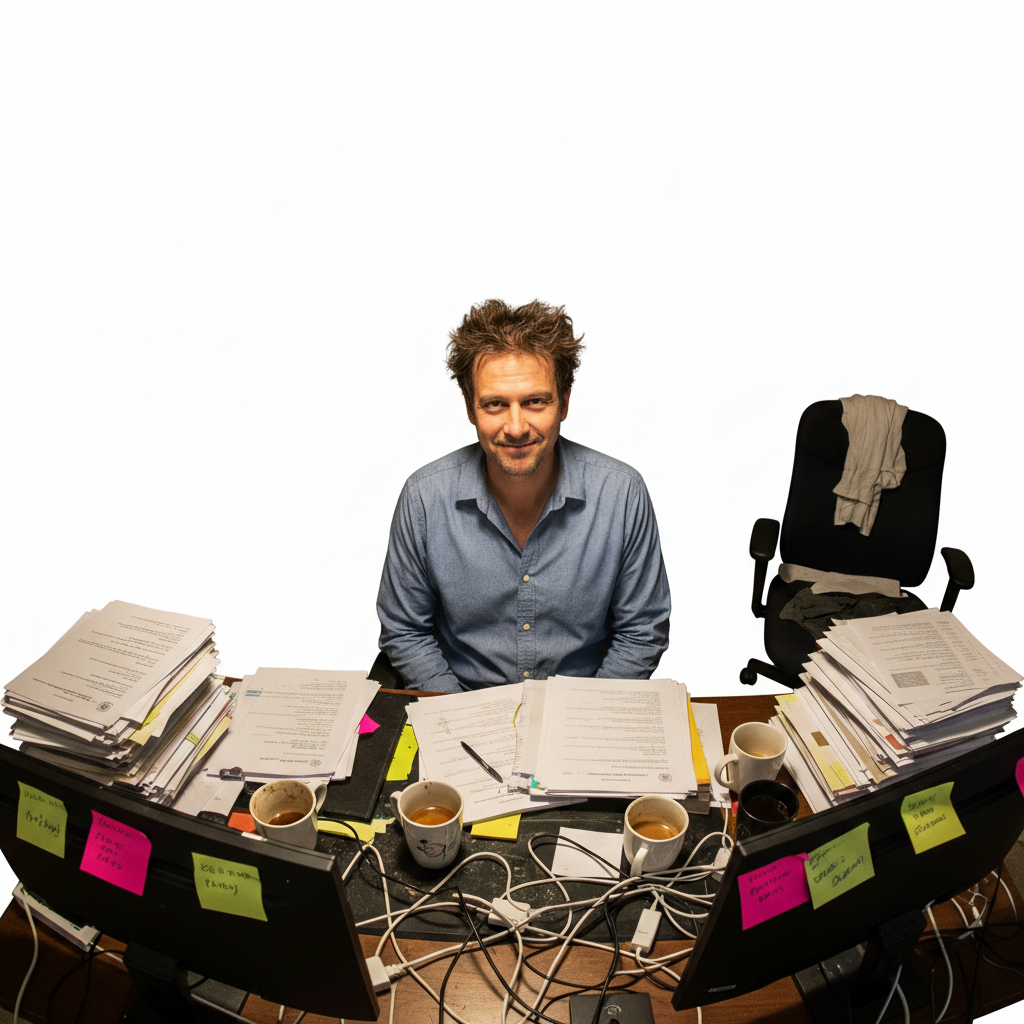
Which is better—blur or replace the background?

Blur when you want to keep the 'at home' or casual vibe but hide embarrassing details. It's faster (10-15 seconds) and looks more natural for social media or dating apps. Replace when you need a professional look for LinkedIn, resumes, or business use. That takes 20-30 seconds and gives you a studio-quality backdrop with zero hint of 'home photo.'

Will people be able to tell I edited out a messy background?

With blurring: No, it looks exactly like a photo taken with a professional camera's portrait mode. Everyone assumes the blur is natural. With background replacement: Only if the lighting doesn't match. Add 'matching the lighting on my face' to your prompt and it looks completely natural. Most people can't tell at all.

Can it hide really messy backgrounds or just small clutter?

It works on extremely messy backgrounds—unmade beds, laundry piles, cluttered desks, messy kitchens, disaster zones. The AI doesn't judge how bad it is. Blur makes anything unrecognizable. Background replacement removes it entirely. Both options work equally well on minor clutter or catastrophic mess.

Do I need to mark where the mess is?

No. Just say 'blur the background' or 'replace background with...' and the AI figures out what's you versus what's the messy room. It automatically detects the subject and processes everything behind you. Only use markers if the first result needs refinement—like if some foreground object got blurred when it shouldn't have.

Is EditThisPic's AI background fixer really free?

Yes — you get 1 free edit per week, no account needed. For unlimited edits, plans start at $3.99/month.

Can I fix background on my phone?

Yes. EditThisPic works in any mobile browser — iPhone, Android, tablet. No app download needed.

What photo formats does the AI background fixer support?

JPG, PNG, WebP, and HEIC. Upload any common photo format and EditThisPic handles the rest.

Ready to hide that messy background?

Free to try. No signup required.

Try it free