Free โ€ข No signup Superimpose Photos ยท Free

Superimpose Photos

Upload two photos and describe where to place the subject. No cutout tools required.

Mountain viewpoint scene and person photo as separate images
Before
โ†’
Person naturally superimposed into the mountain scene
After

Superimpose Photos

Drop your photo here

or click to browse

Release to upload

Free โ€ข No signup

Advertisement
Popular use cases:
  • Travel photo composites
  • Family photo additions
  • Product lifestyle shots
  • Pet photo scenes
  • Group photo fixes
  • Memorial photo creations
  • Social media composites

Cost
Free No signup required
Time
Instant results in 15-30 seconds
Works on
Any device - browser, phone, tablet, desktop
Powered by
AI-powered photo editing
Scenario Prompt Time
Person into scene superimpose the person into the left side of the beach scene 30s
Product placement place the product on the wooden table, sized naturally 25s
Pet into location superimpose the dog onto the grass, sitting naturally 25s
Add to group add the person to the right side of the group photo 35s

How it works

  1. Upload your background scene

    Drop your destination image into EditThisPic. This is the scene where you want to place the subject from your other photo. JPG, PNG, and WebP up to 7MB all work.

    Expect: Simple superimposition: 20-30 seconds. Complex scenes with lighting matching: may need 2-3 refinements.
  2. Add the photo with your subject

    Click the reference image button and upload the photo containing the person, object, or element you want to superimpose. The AI will extract the subject automatically - no need to cut them out first.

    Tip: Photos with clear subject-background separation work best. The AI can extract subjects from busy backgrounds but clean photos give cleaner results.
  3. Describe the superimposition

    Type your instruction: 'superimpose the person into the left side of the beach scene' or 'place the dog sitting on the couch.' Describe positioning and any adjustments needed. The AI handles extraction, sizing, and lighting matching.

    Tip: Include position details: 'standing on the left,' 'sitting in the chair,' 'in the background' for accurate placement.

    Copy one of these to get started:

    Person into vacation scene superimpose the person from the reference photo into the left side of the beach scene, standing naturally and looking at the camera
    Product into lifestyle setting place the product from the reference image onto the wooden table in the background photo, sized appropriately and lit to match the scene
    Pet into new environment superimpose the dog from the reference photo onto the grass in the park scene, sitting naturally like they belong there
    Person into group photo add the person from the reference photo to the right side of the group, matching their size and position to fit naturally with the others
    3 more prompts
    Object onto surface superimpose the vase from the reference photo onto the shelf in the living room scene, positioned in the center
    Person behind element superimpose the person into the forest scene, positioned behind the large tree on the left as if partially hidden
    Multiple subjects superimpose both people from the reference photo into the landscape, standing together on the right side near the viewpoint
  4. Generate and refine

    Tap generate and check the result. Verify the subject looks natural in the scene - lighting direction, scale, and perspective should match. If edges need work or positioning is off, regenerate with more specific instructions.

    Tip: If the subject is too large or small, specify: 'make the person smaller to match the background scale.'
Try it free โ†“

Superimpose Photos

Drop your photo here

or click to browse

Release to upload

Free โ€ข No signup

"Superimposed my son into a photo from our trip he missed. The lighting matches perfectly - you can't tell it wasn't taken there." @FamilyMemories_Lisa
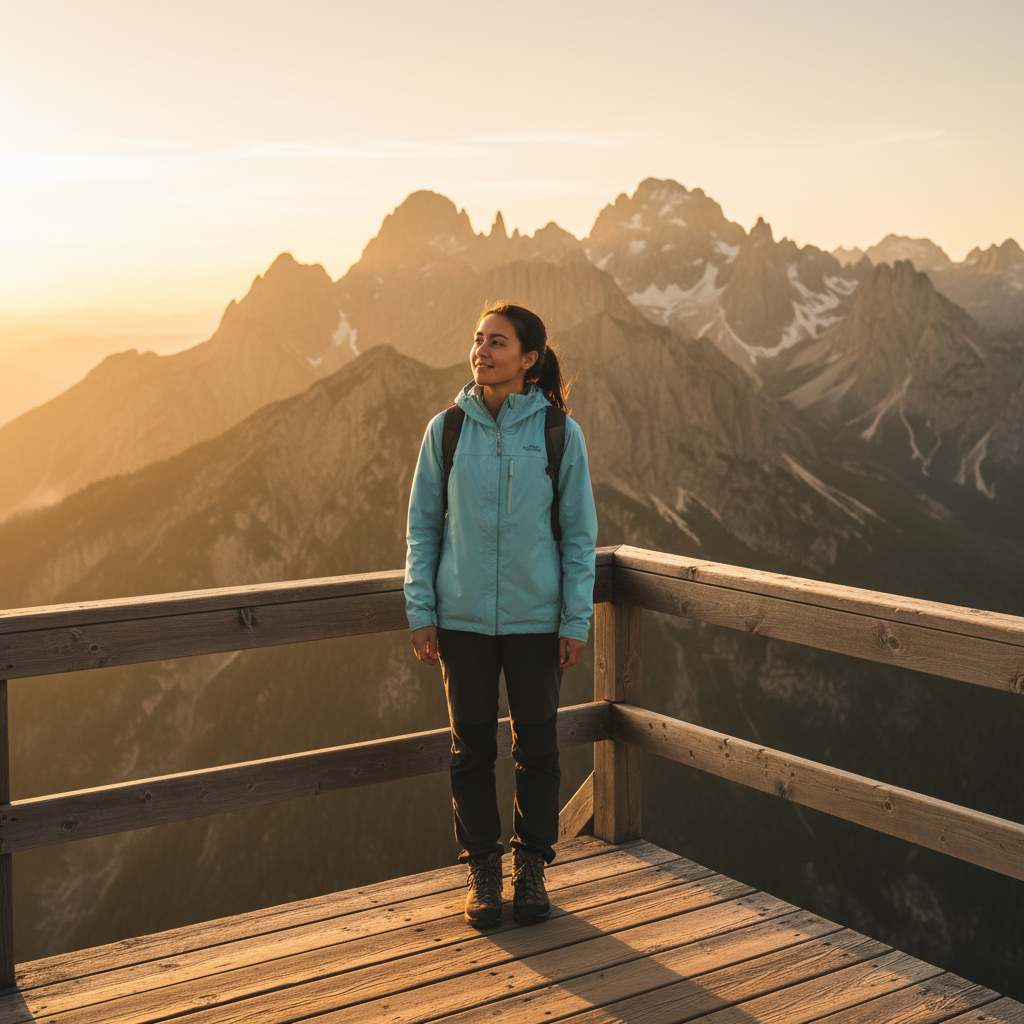
See it in action

Mountain viewpoint scene and person photo as separate images
Before
->
Person naturally superimposed into the mountain scene
After

Person superimposed into travel photo

Subject extracted from casual photo and placed into a scenic travel destination. Lighting and scale adjusted to look like they were actually there.

Prompt: superimpose the person from the reference photo into the center of the mountain viewpoint scene, standing naturally and looking at the view
Kitchen counter scene and product photo as separate images
Before
->
Product naturally superimposed onto kitchen counter
After

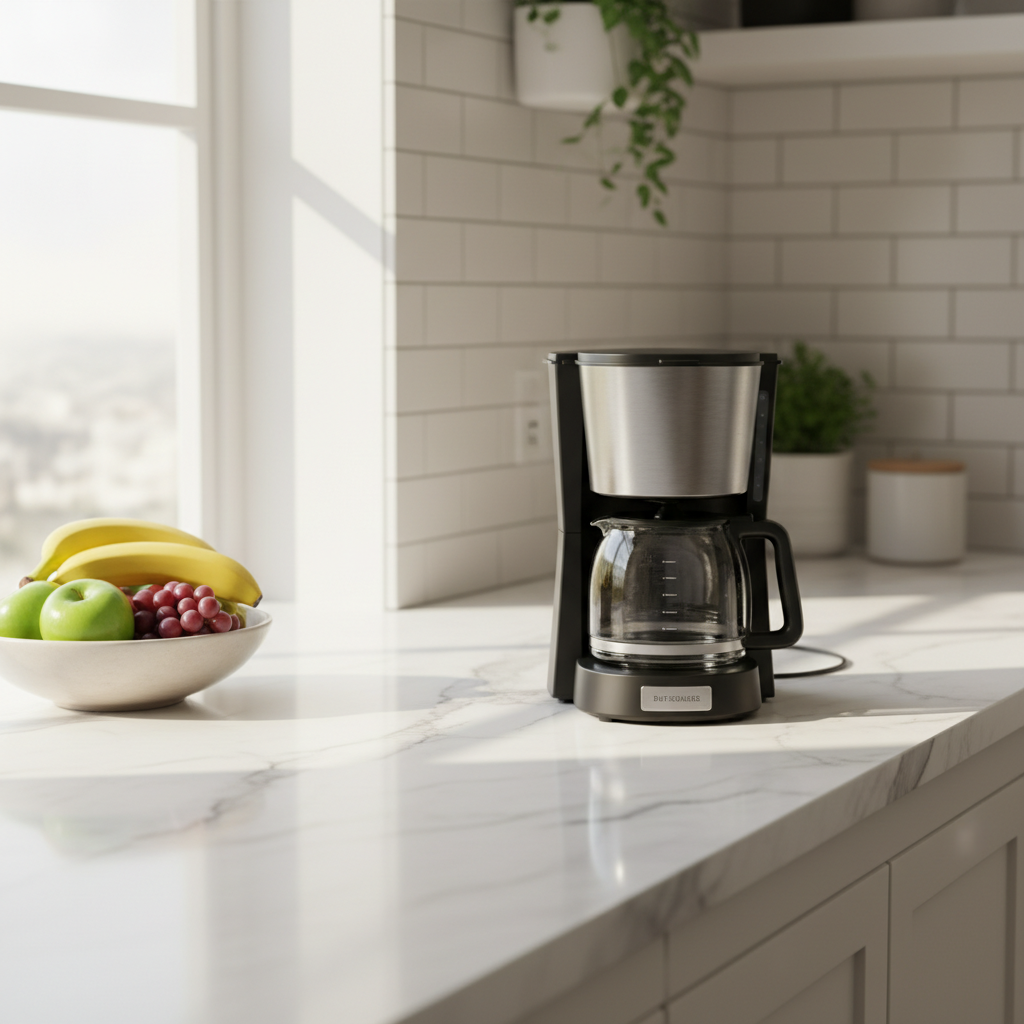
Product superimposed into lifestyle scene

Product photo placed into an attractive lifestyle setting. The AI matched the lighting and perspective to make the product look like it was photographed there.

Prompt: place the coffee maker from the reference photo onto the kitchen counter, positioned on the right side and sized naturally for the space
Park scene and dog photo as separate images
Before
->
Golden retriever naturally superimposed onto park grass
After

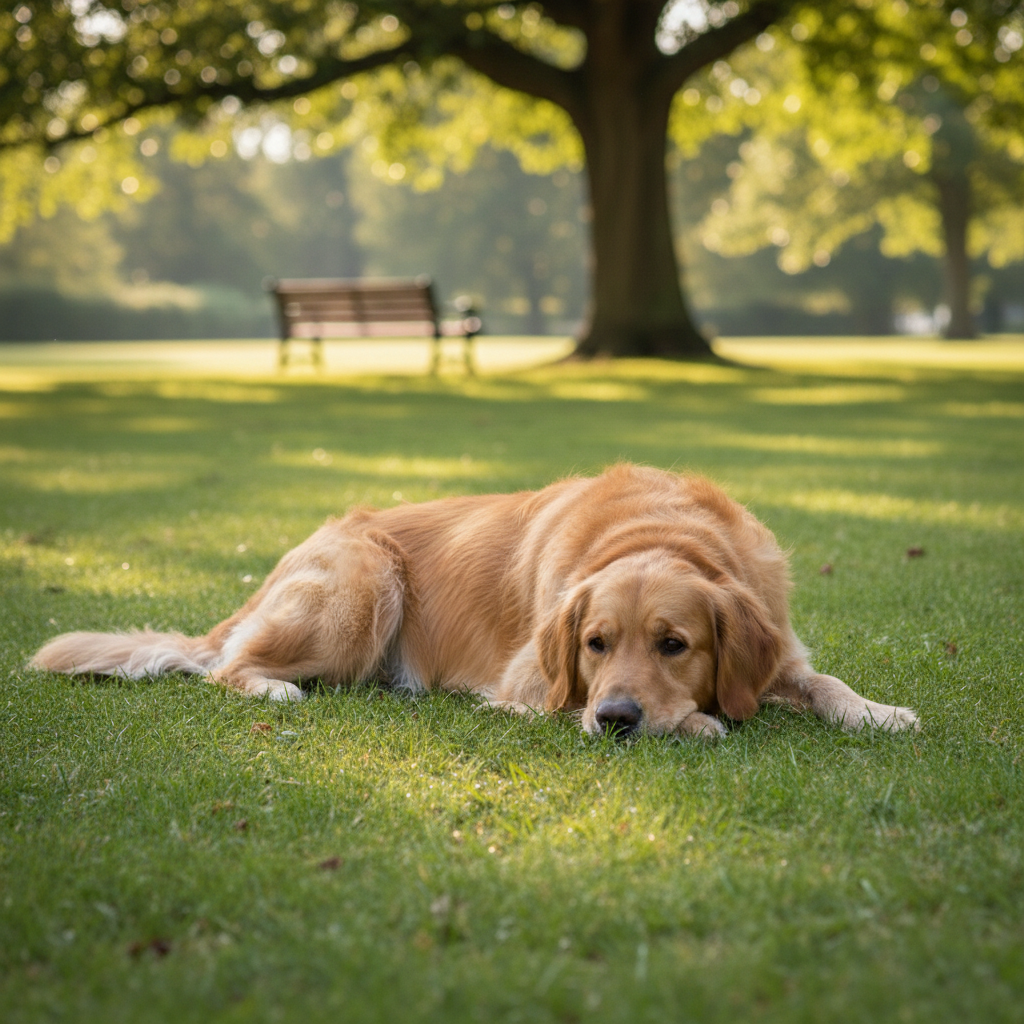
Pet superimposed into outdoor scene

Family pet placed into a park scene where they weren't present. The dog looks naturally positioned with matching shadows and lighting.

Prompt: superimpose the golden retriever from the reference photo onto the grass in the park, lying down naturally in the sunlight
Advertisement

If something looks off

AI changed the wrong area or something I didn't want changed

Why: The AI couldn't determine exactly where in the scene you wanted the subject placed. This happens with vague position descriptions.

Try: Tap a marker on the exact spot where you want the subject placed, then regenerate with the same prompt

Tip: Markers tell the AI 'I mean THIS exact spot.' Use them when you need precise positioning in a scene.

Subject looks pasted on - edges are too sharp or obvious

Why: The extraction was clean but the integration lacks the subtle blending that makes it look natural. This happens when lighting or blur levels don't match.

Try: superimpose with soft blended edges and match the lighting direction from the background scene

Tip: Adding 'soft blended edges' helps the AI feather the extraction for more natural integration.

Subject is the wrong size for the scene

Why: The AI couldn't accurately judge the scale relationship between your subject and the background scene elements.

Try: superimpose the person and scale them to be the same height as the doorway visible in the background

Tip: Reference visible objects in the scene for scale: 'same height as the car,' 'should fit behind the table.'

Lighting on subject doesn't match the scene

Why: The reference photo was shot in different lighting conditions than the background. Shadows and highlights point in conflicting directions.

Try: superimpose and adjust the lighting on the person to match the sunlight coming from the upper left in the background

Tip: Describe the lighting direction: 'match the sunset light' or 'adjust shadows for indoor lighting.'

Wrong subject was extracted from reference photo

Why: The reference photo had multiple elements and the AI chose the wrong one to superimpose.

Try: superimpose only the person on the left from the reference photo, ignore the person on the right

Tip: Be specific about which element to extract: 'the red car,' 'the woman in blue,' 'the taller plant.'

Quick answers

Do I need to cut out the subject before superimposing?

No. Just upload the photo with your subject - the AI automatically extracts them from their background. You only need to describe what to superimpose and where: 'superimpose the person into the beach scene.' No selection tools or manual cutouts required.

How do I superimpose one photo onto another for free?

Upload your background scene to EditThisPic, click the reference image button to add the photo with your subject, then describe the placement: 'superimpose the dog onto the couch.' The AI extracts, positions, and blends in 20-40 seconds. No account, no login, no watermarks.

Is there a free superimpose tool without signup?

Yes. EditThisPic superimposes photos without requiring an account. Upload both images, describe where the subject should go, and download your result. No watermarks added. Works directly in your browser with AI handling extraction and placement.

Will the superimposed subject look realistic?

Yes, when the lighting conditions are similar. The AI matches lighting direction, adjusts shadows, and blends edges. For best results, use reference photos where the light comes from a similar direction as your background scene. You can also ask the AI to 'adjust lighting to match.'

Can I superimpose myself into a photo I wasn't in?

Yes. Upload the photo you want to appear in as the background, then add a photo of yourself as the reference. Describe where to place yourself: 'superimpose me standing on the left side of the group.' The AI handles extraction and placement to make it look natural.

Ready to superimpose your photos?

Free to try. No signup required.

Try it free โ†’