Free • No signup Enhance Food appearance · Free

AI Food Look Appetizing Maker

Describe how to improve your food photo and AI enhances it instantly. No marking needed.

Dull pasta dish with flat colors and poor lighting
Before
Same pasta with vibrant colors and professional restaurant lighting
After

AI Food Look Appetizing Maker

Upload photo to enhance food appearance

Free • Results in 30 seconds • No signup

Release to upload

FreeNo signupNo watermark
Popular use cases:
  • food blog photography
  • restaurant menus
  • recipe content
  • food marketing
  • Instagram food posts
  • meal delivery apps
  • cookbook photography
  • culinary portfolios

Cost
Free No signup required
Time
Instant results in 15-30 seconds
Works on
Any device - browser, phone, tablet, desktop
Powered by
AI-powered photo editing
Scenario Prompt Time
Quick color boost make the food look more vibrant and fresh 30s
Professional upgrade make this restaurant-quality with great lighting 45s
Social media ready make it Instagram-worthy and mouth-watering 40s

How it works

  1. Upload your food photo

    Upload your product photo on a clean surface. Even lighting and a simple background help the AI focus on food appearance details. JPG, PNG, WebP up to 7MB.

    Expect: Simple enhancements: 30-40 seconds. Comprehensive transformations: 45-60 seconds.
  2. Describe the improvements

    Type what you want: 'make the food look more appetizing and fresh' or 'enhance colors and lighting to look restaurant-quality.' Be specific about what should improve—colors, freshness, lighting, or overall appeal. The AI understands food photography context.

    Tip: Combine improvements for best results: 'make colors vibrant, add freshness, and improve lighting' targets multiple aspects at once.

    Copy one of these to get started:

    General food enhancement make the food look more appetizing and fresh, enhance colors and lighting
    Restaurant-quality presentation make this look restaurant-quality - vibrant colors, professional lighting, appetizing
    Restaurant menu photo enhance food appearance for a restaurant menu — warm, appetizing lighting, rich colors, and make the food the clear focal point against a clean background
    Fresh and natural look enhance the food to look fresh and naturally appealing, not oversaturated
    3 more prompts
    Baked goods appeal make the baked goods look golden, fresh from the oven, and delicious
    Improve poor lighting fix the lighting to make the food look better lit and more appealing
    Boost color vibrancy enhance the colors to make the food look more vibrant and appetizing, keep it natural
  3. Review the transformation

    Check that colors look natural and vibrant, not oversaturated. Verify lighting enhances the food without washing it out. Look for improved texture details and overall appetizing appearance.

  4. Refine with markers if needed

    If specific food items need different treatment—like brightening only the main dish while keeping garnishes natural—tap markers on those areas and regenerate. Most enhancements work perfectly on the first try.

    Tip: Markers help when you want different enhancement levels for different parts: bright salad greens, rich meat tones, etc.
Try it free

AI Food Look Appetizing Maker

Upload photo to enhance food appearance

Free • Results in 30 seconds • No signup

Release to upload

Free • No signup

"I run a food blog and used to spend hours in Lightroom tweaking each photo. Now I just tell the AI 'make it look appetizing and Instagram-ready' and get publication-worthy photos in seconds." @TastefulBites_Sarah

See it in action

Dull pasta dish with flat colors and poor lighting
Before
->
Same pasta with vibrant colors and professional restaurant lighting
After

Restaurant plate transformation

A dull pasta dish enhanced to look fresh, colorful, and restaurant-quality with improved lighting and colors.

Prompt: make this look restaurant-quality - vibrant colors, professional lighting, appetizing
Faded salad bowl with dull colors
Before
->
Same salad with vibrant greens and appetizing fresh appearance
After

Instagram-ready salad

A plain salad photo transformed into a bright, colorful, mouth-watering image perfect for social media.

Prompt: make the food look Instagram-worthy - bright, colorful, and mouth-watering
Pale muffins with dull brown color
Before
->
Same muffins with golden tops looking fresh and delicious
After

Baked goods glow-up

Plain muffins enhanced to look golden, fresh from the oven, and delicious for a bakery website.

Prompt: make the baked goods look golden, fresh from the oven, and delicious

Detailed Guides by Scenario

📷

Photo Rescue & Restoration

Revive old, damaged, or poorly-shot photos with AI food appearance — bring new life to images you thought were unsalvageable.

Common Scenarios

  • Applying food appearance to old family photos that have degraded over time
  • Fixing a once-in-a-lifetime shot (wedding, graduation) that suffers from poor quality
  • Using food appearance on scanned prints to get crisp digital versions

Best Practices

  • Scan old photos at the highest DPI your scanner supports before uploading for best results
  • Describe the specific issue — 'this photo is too dark and blurry' gives better food appearance than a generic prompt
  • For severely damaged photos, work in stages: fix the biggest issue first, then refine
📷

Professional & Business Use

Ensure photos for websites, presentations, and marketing meet professional standards with food appearance.

Common Scenarios

  • Using food appearance on employee photos for a company website that need to look polished
  • Applying food appearance to event photos before sharing in a client presentation
  • Improving product images with food appearance for an online store or catalog

Best Practices

  • Process all images in a batch with the same enhancement settings for visual consistency
  • For web use, balance enhancement quality with file size — overly large images slow page loads
  • Always compare before and after to make sure food appearance looks natural, not over-processed
📷

Social Media & Personal Sharing

Make your personal photos look their best before sharing with friends, family, or followers using food appearance.

Common Scenarios

  • Quickly applying food appearance to vacation photos before posting on social media
  • Using food appearance on a selfie that has great composition but poor lighting
  • Batch-fixing a phone gallery of photos with food appearance before creating an album to share

Best Practices

  • Start with the photo you'd most like to share — fix that one first and use the same approach on the rest
  • For selfies, subtle enhancement always beats heavy processing — keep it natural
  • If the photo was shot in low light, mention it in the prompt so the AI tailors food appearance accordingly

If something looks off

AI changed the wrong area or something I didn't want changed

Why: The AI couldn't determine exactly which area you meant from description alone.

Try: Tap a marker on the specific area you want to change, then regenerate with the same prompt

Tip: Markers tell the AI 'I mean THIS one specifically.' Use them when description alone is ambiguous.

AI changed the wrong part of the photo or affected the background too much

Why: Enhancement prompts can affect the entire image when you only want food improved, not plates or backgrounds.

Try: Tap markers on the specific food items you want enhanced, then regenerate with the same prompt

Tip: Markers isolate enhancement to just the food while leaving table settings and backgrounds untouched.

Colors look oversaturated or unrealistic

Why: Generic enhancement can push colors too far, especially with already-bright foods.

Try: enhance the food to look fresh and naturally appealing, not oversaturated, keep colors realistic

Tip: Adding 'not oversaturated' or 'keep colors realistic' prevents the AI from overdoing vibrancy.

Food lost texture details or looks too smooth

Why: Aggressive lighting or color enhancement can reduce texture sharpness and make food look artificial.

Try: enhance the food while preserving texture details and natural grain

Tip: 'Preserving texture details' ensures crispy bread looks crispy, meat looks realistic, etc.

Lighting changed but made some areas too bright or dark

Why: Lighting adjustments can create hotspots or shadows that weren't in the original photo.

Try: improve the lighting evenly across the food, avoid bright spots or dark shadows

Tip: 'Evenly' tells the AI to balance lighting without creating harsh contrasts.

Enhancement looks good on some food but not others in the same photo

Why: Different food types respond differently to the same enhancement—what works for greens might not work for meat.

Try: Use markers to enhance different items separately: tap markers on greens and say 'brighten vegetables,' then repeat for other items

Tip: Sequential targeted enhancements give you precise control over each food type.

Result looks airbrushed or fake

Why: Too much enhancement can make food look like a digital rendering instead of a real photograph.

Try: make the food look more appetizing while keeping it natural and realistic, subtle enhancement

Tip: 'Subtle enhancement' and 'realistic' keep results in the photography range, not CGI range.

Quick answers

Do I need to mark which parts of the food to enhance?

No! Just describe what you want: 'make the food look more appetizing' or 'enhance colors and lighting.' The AI recognizes food in the photo and improves it automatically. Only use markers if you want different enhancement levels for different items—like brightening vegetables more than meat.

How is this different from just increasing saturation or brightness?

AI enhancement understands food context. It knows to make greens vibrant, meats rich, baked goods golden, and liquids clear—all simultaneously. Manual sliders apply the same change everywhere. The AI also improves lighting, texture rendering, and freshness in ways simple adjustments can't match.

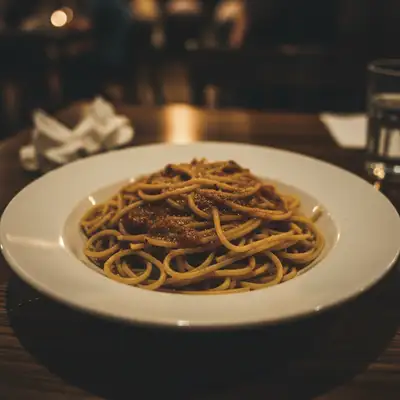
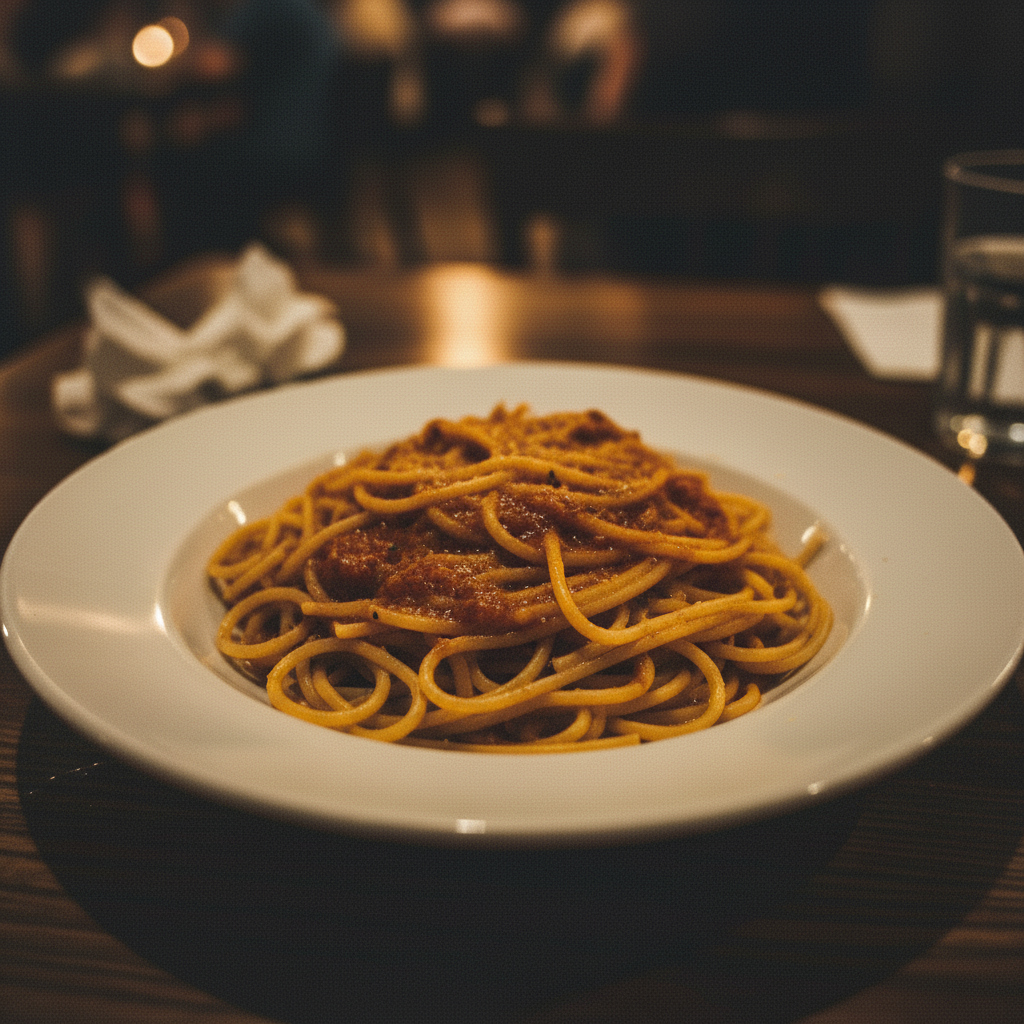
Can this fix food photos taken in bad lighting?

Yes! Tell the AI: 'fix the lighting to make the food look better lit and more appealing' or 'improve lighting to restaurant-quality.' It can rescue photos shot in dim restaurants, harsh overhead lights, or poor natural light by rebalancing exposure and adding depth.

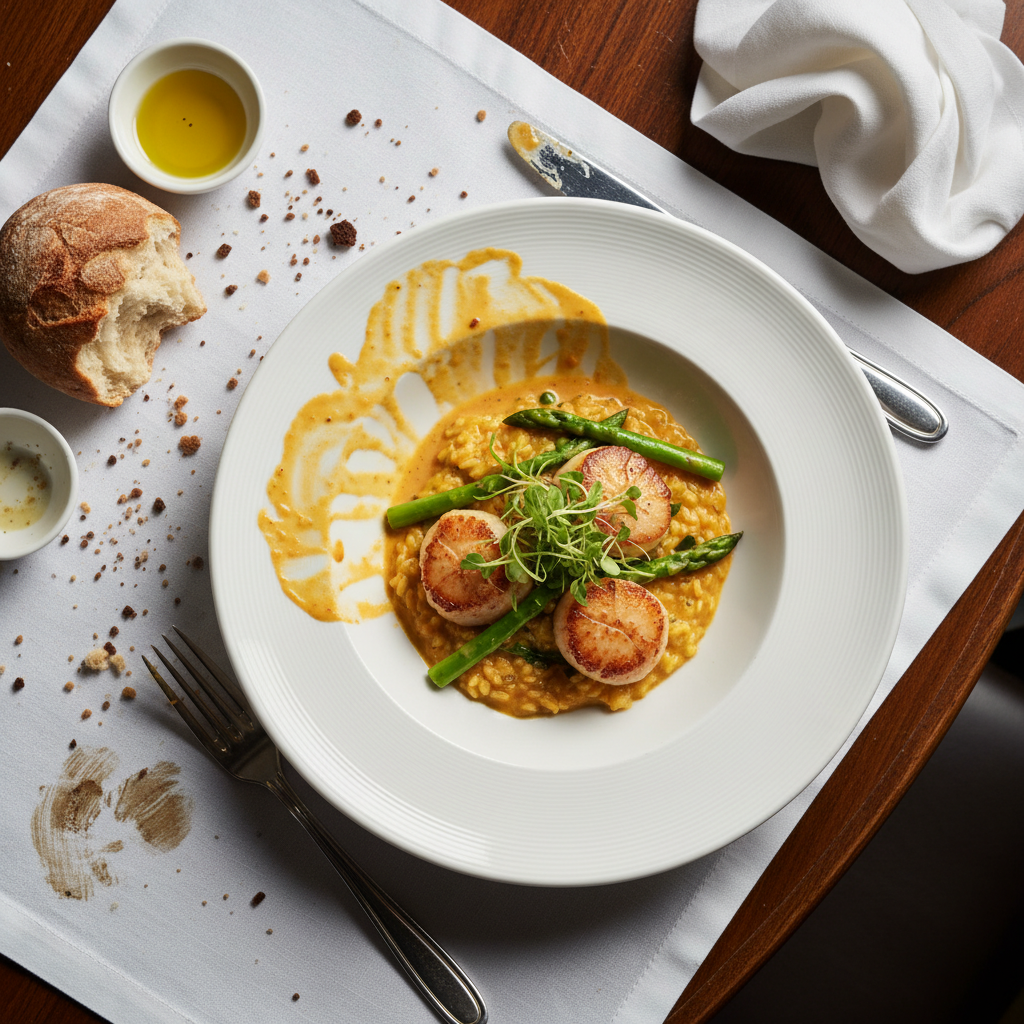
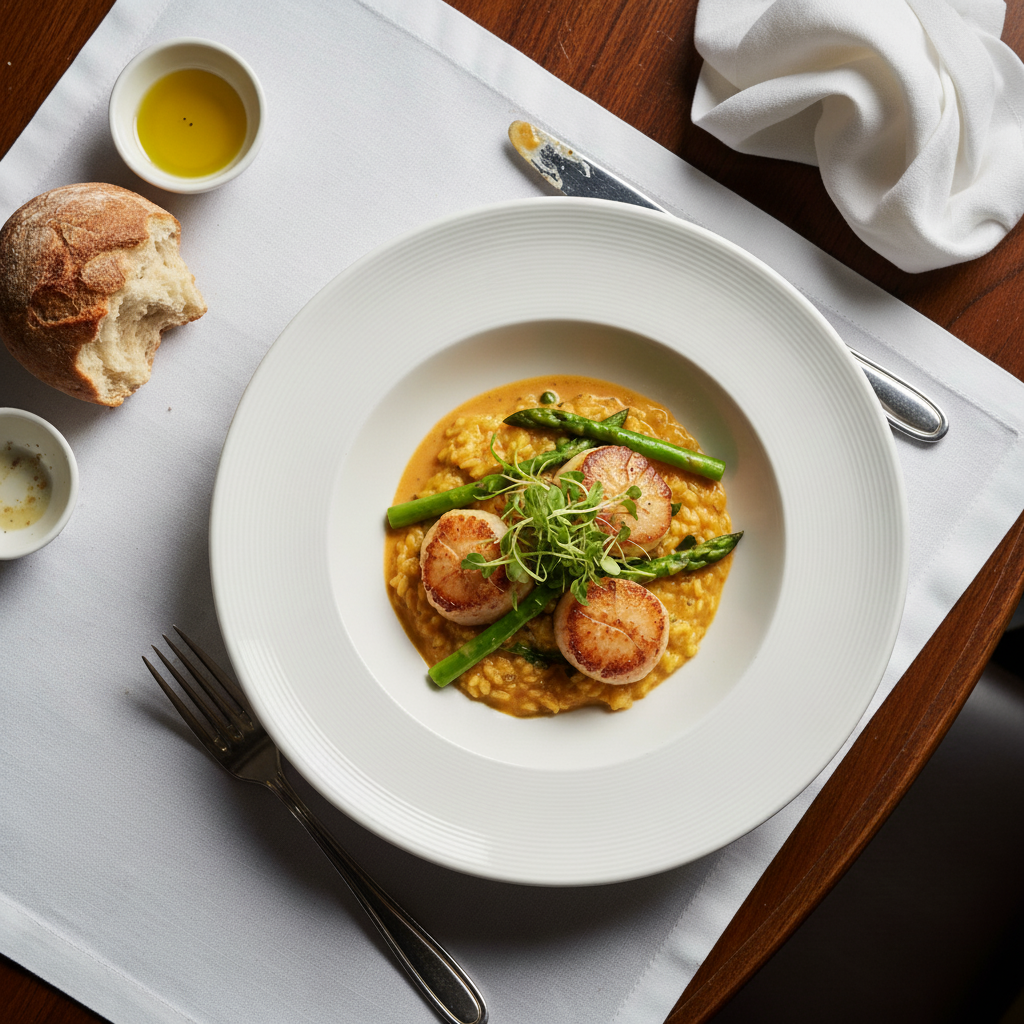
Will my food photos still look natural after enhancement?

Yes, if you ask for it. Include words like 'natural', 'realistic', 'not oversaturated', or 'subtle' in your prompt. The AI balances improvement with believability. Compare 'make it Instagram-worthy' (vibrant, high impact) vs. 'enhance naturally' (realistic improvement).

What's the best way to make food photography look professional?

EditThisPic offers free AI food enhancement with no signup. Unlike manual editing that requires adjusting dozens of sliders, just describe the look you want: 'make it restaurant-quality' or 'Instagram-worthy.' The AI handles colors, lighting, freshness, and texture in one step, generating results in 30-45 seconds.

Is EditThisPic's AI food appearance enhancer really free?

Yes — you get 1 free edit per week, no account needed. For unlimited edits, plans start at $3.99/month.

Can I enhance food appearance on my phone?

Yes. EditThisPic works in any mobile browser — iPhone, Android, tablet. No app download needed.

What photo formats does the AI food appearance enhancer support?

JPG, PNG, WebP, and HEIC. Upload any common photo format and EditThisPic handles the rest.

Ready to make your food photos more appetizing?

Free to try. No signup required.