Free • No signup Add Starry sky · Free

AI Starry Sky Maker

Transform night photos with realistic star fields and Milky Way using simple descriptions.

Camping tent at night with empty dark sky
Before
Same tent with Milky Way and stars filling sky
After

Add Stars to Night Sky

Drop your photo here

or click to browse

Release to upload

Free • No signup

Advertisement
Popular use cases:
  • astrophotography
  • camping photos
  • night landscapes
  • outdoor adventure
  • travel photography
  • wilderness photography
  • Instagram night shots
  • astronomy photos

Cost
Free No signup required
Time
Instant results in 15-30 seconds
Works on
Any device - browser, phone, tablet, desktop
Powered by
AI-powered photo editing
Scenario Prompt Time
Dense stars + Milky Way add a dense starry sky with thousands of visible stars and the Milky Way stretching diagonally 20s
Scattered moderate stars add scattered stars across the night sky with moderate density, varied brightness 15s
Milky Way galactic core add the bright Milky Way galactic core with orange and purple nebula colors 20s
Light pollution stars add sparse visible stars appropriate for suburban location with some light pollution 15s

How it works

  1. Upload your night photo

    Drop your night or dark sky photo into EditThisPic. JPG, PNG, WebP up to 7MB. Best results come from photos with dark visible sky—campfire shots, night landscapes, twilight scenes. The darker the sky, the more natural stars will look. Photos taken during blue hour or with some ambient light work well.

    Expect: Simple star additions to clear dark skies: 15-30 seconds. Complex Milky Way integration or matching specific lighting: may need 2-3 refinements for perfect realism.
  2. Describe the starry sky you want

    Type your instruction: 'add a dense starry sky with thousands of visible stars' or 'add the Milky Way galaxy stretching diagonally across the sky with surrounding stars.' Be specific about star density (sparse, moderate, dense), brightness levels, and whether you want the Milky Way visible. No masking needed—the AI understands night sky areas and prevents stars from appearing over foreground objects. Include details like 'avoiding light pollution' or 'clear mountain night sky' for natural results.

    Tip: Mention the viewing conditions like 'remote location with no light pollution' or 'crystal clear night' to help AI create appropriate star density and visibility.

    Copy one of these to get started:

    Dense star field with Milky Way add a dense starry sky with thousands of visible stars and the Milky Way galaxy stretching diagonally across the frame, no light pollution, clear dark night
    Subtle scattered stars add scattered stars across the night sky with moderate density, varied brightness, creating natural night atmosphere without overwhelming the scene
    Prominent Milky Way core add the bright Milky Way galactic core on the right side of the sky with orange and purple nebula colors, surrounded by dense stars
    Light pollution city stars add sparse visible stars appropriate for suburban location with some light pollution, dimmer stars, fewer visible in total
    3 more prompts
    Winter night constellation stars add bright crisp stars with high visibility across the entire dark sky, mimicking cold winter night conditions with extra clear atmosphere
    Horizontal Milky Way arc add the Milky Way stretching horizontally from left to right along the horizon with the galactic core rising on the right, dense surrounding stars
    Astrophotography-style star trails beginning add thousands of pinpoint stars with slight elongation suggesting short exposure astrophotography, no trails yet, dense star field across the entire sky
  3. Generate and review the stars

    AI analyzes your sky darkness, foreground elements, and lighting to add stars with realistic distribution, size variation, and brightness. Check that stars respect the horizon and don't appear over trees, mountains, or buildings. Zoom in to verify natural star twinkling effect and varied star sizes mimicking real astrophotography.

  4. Refine star placement with markers if needed

    If stars appeared over foreground objects or you want denser stars in specific sky zones, tap markers on those areas and regenerate. This is optional—most star additions correctly respect foreground boundaries. Use markers to concentrate the Milky Way in a specific sky region or adjust star density in particular areas.

    Tip: Markers help when you want the Milky Way positioned in a specific part of the frame or need to keep stars away from artificial lights in your scene.
Try it free

Add Stars to Night Sky

Drop your photo here

or click to browse

Release to upload

Free • No signup

"Added the Milky Way to my camping photo. The stars look so realistic, and it matched my photo's darkness perfectly." @outdooradventurer

See it in action

Camping tent at night with empty dark sky
Before
->
Same tent with Milky Way and stars filling sky
After

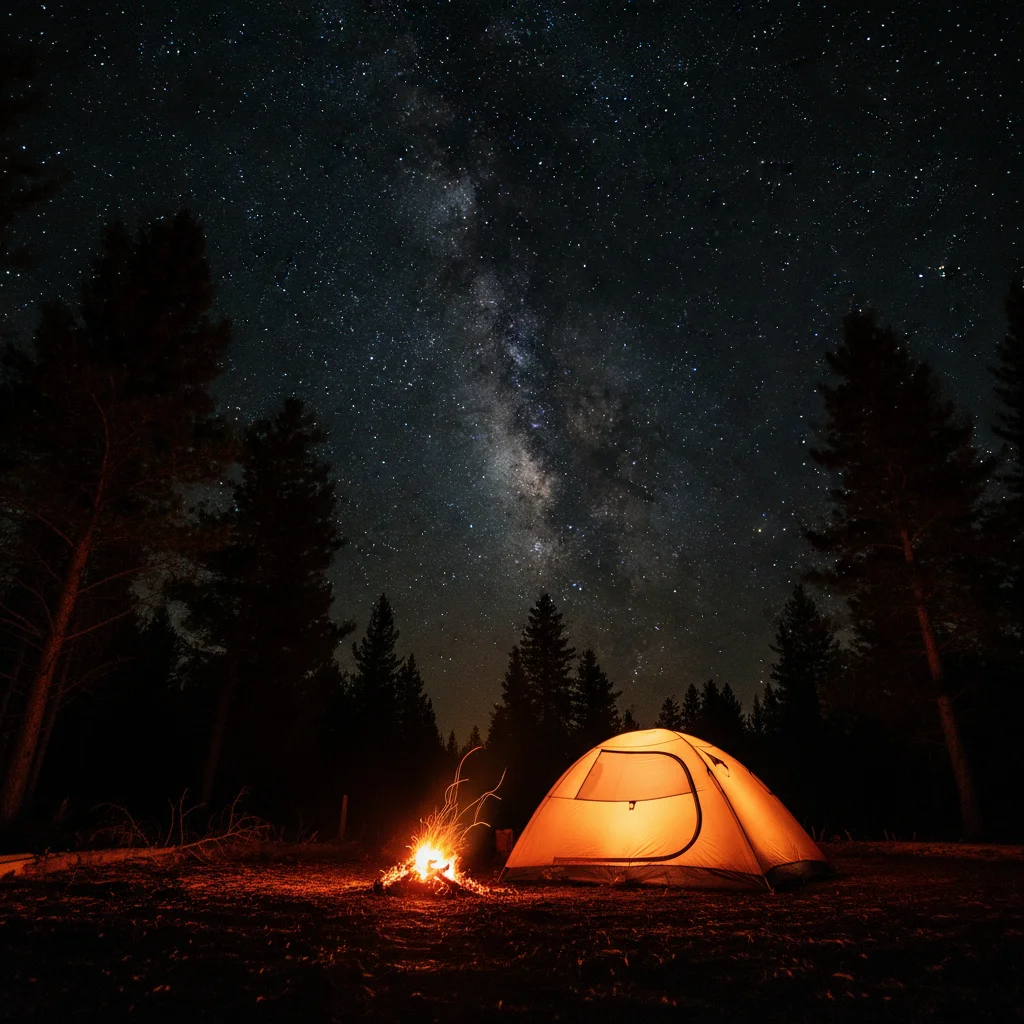
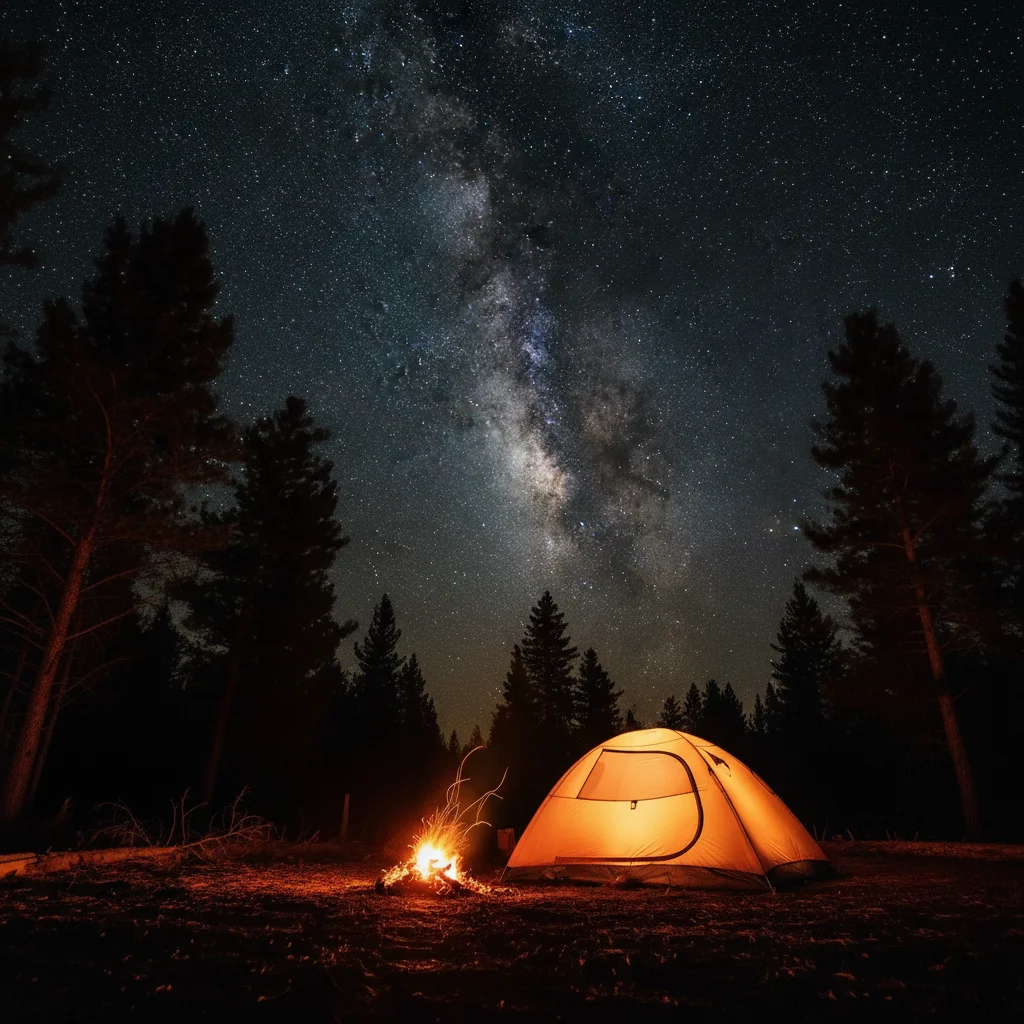
Camping tent under Milky Way

Added the full Milky Way arc and dense star field to a camping photo. The stars naturally avoided the tent and trees while filling the sky dramatically.

Prompt: add a dense starry sky with thousands of visible stars and the Milky Way galaxy stretching diagonally across the frame, no light pollution, clear dark night
Desert twilight with no stars visible
Before
->
Same desert with scattered stars appearing
After

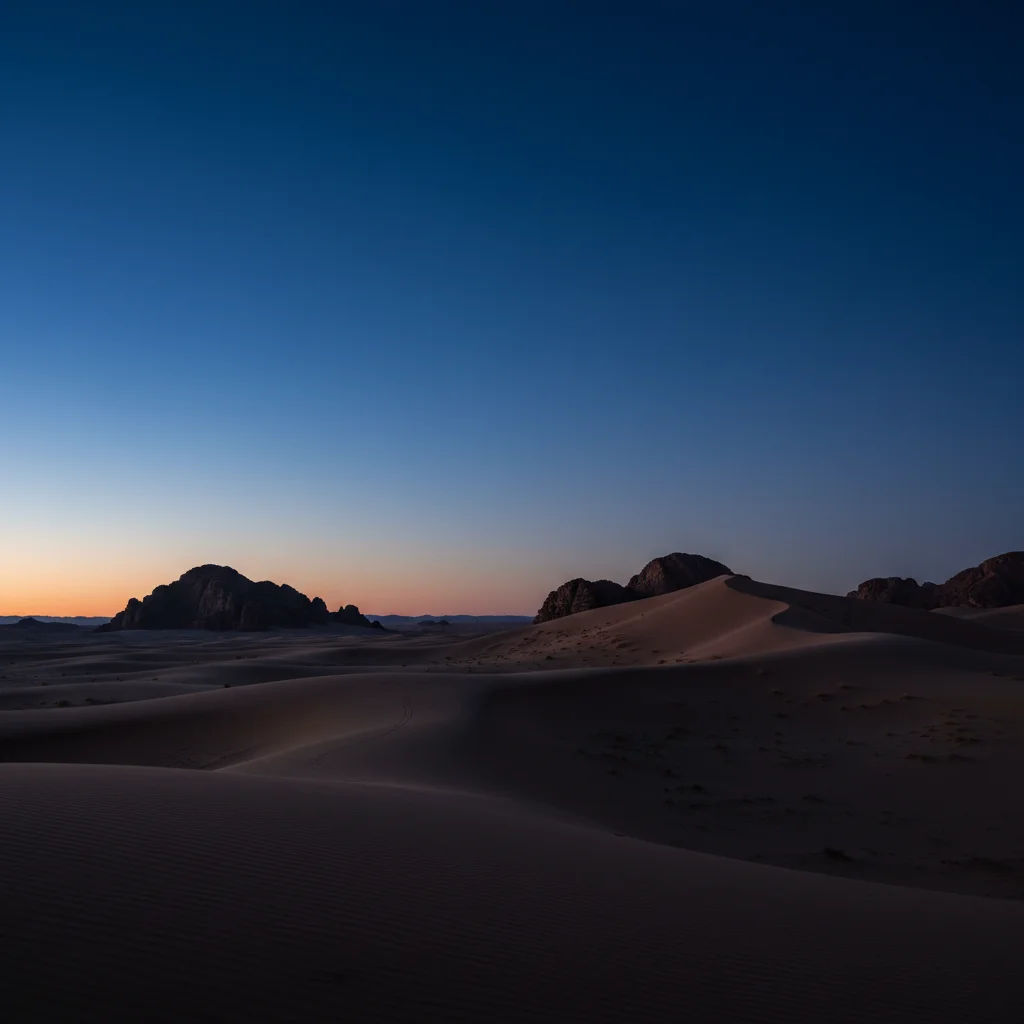
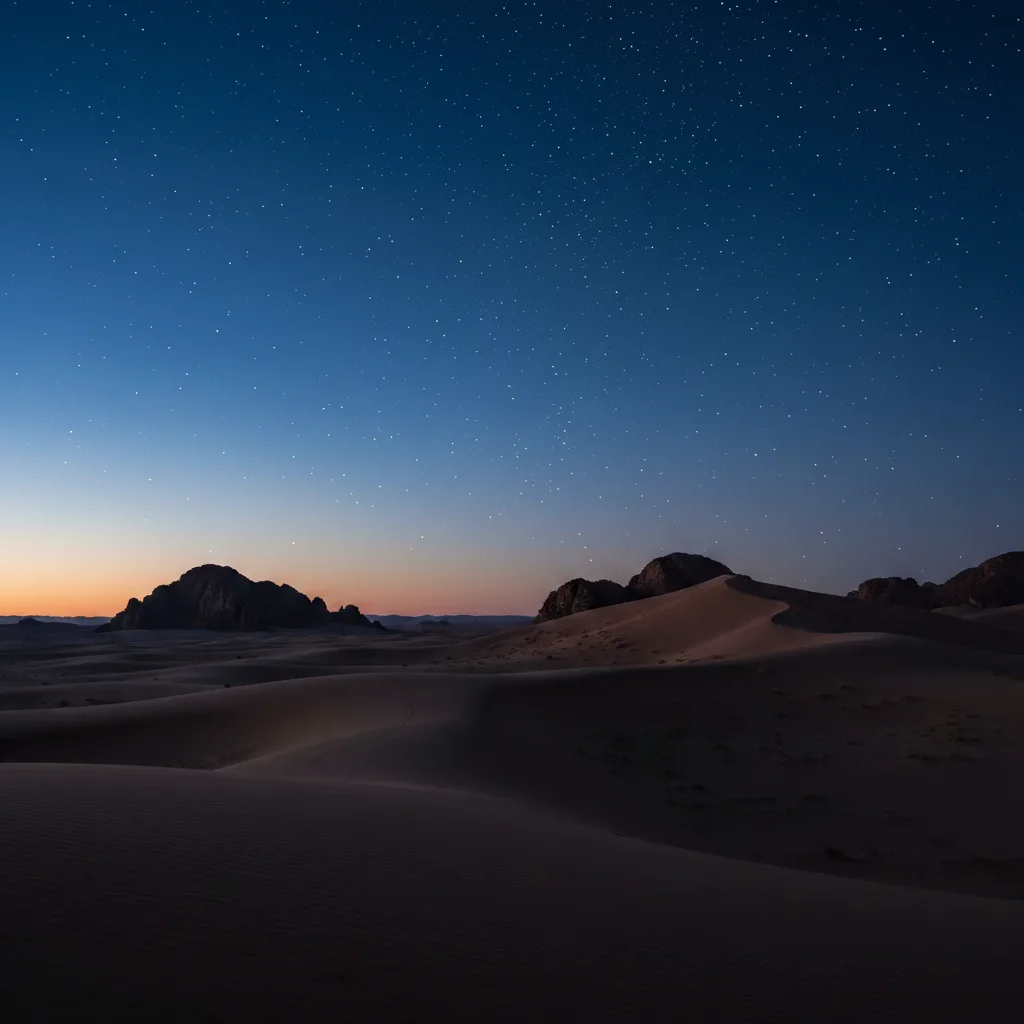
Desert landscape with star field

Enhanced a twilight desert photo by adding scattered stars that complemented the remaining blue hour light without overwhelming the scene.

Prompt: add scattered stars across the night sky with moderate density, varied brightness, creating natural night atmosphere without overwhelming the scene
Mountain silhouette with empty dark sky
Before
->
Same mountain with Milky Way core and stars
After

Mountain peak with galactic core

Added the dramatic Milky Way galactic core rising behind a mountain peak, creating an astrophotography-worthy image with colorful nebula regions visible.

Prompt: add the bright Milky Way galactic core on the right side of the sky with orange and purple nebula colors, surrounded by dense stars
Advertisement

If something looks off

Stars appear over foreground objects like trees or buildings

Why: The AI didn't correctly identify the boundary between sky and foreground silhouettes. Stars should only appear in open sky areas.

Try: Use markers to define the exact sky boundary, marking around the tops of trees, mountains, or buildings where stars should begin

Tip: Complex skylines with many objects may need markers to prevent stars from appearing in front of silhouettes.

Stars look too uniform or artificial, like a pattern

Why: Natural star fields have varied star sizes, brightness levels, and random distribution. Uniform stars look computer-generated.

Try: Regenerate with: 'add stars with varied brightness levels, random distribution, different sizes from tiny pinpoints to slightly larger bright stars'

Tip: Real astrophotography shows natural variation—request 'realistic astrophotography star variation' for better results.

Milky Way is too faint or barely visible

Why: Without intensity guidance, the AI may default to subtle effects. The Milky Way should be a prominent feature if you want it visible.

Try: Use: 'add the bright and prominent Milky Way with clearly visible galactic core and nebula colors' or 'add vivid Milky Way with high contrast'

Tip: Words like 'bright', 'prominent', 'vivid', or 'clearly visible' increase Milky Way intensity.

Star density is too high or too low for my scene

Why: Default density may not match your intended viewing location. Remote dark skies show thousands of stars; suburban areas show fewer.

Try: Specify location context: 'add stars appropriate for remote wilderness, no light pollution, maximum visibility' or 'add sparse stars for suburban night with some light pollution'

Tip: Mention viewing conditions (remote wilderness, suburban, rural) to get appropriate star density.

Stars are too bright for my photo's darkness level

Why: Star brightness should match your scene's overall exposure. Very dark scenes need dimmer stars; lighter scenes can have brighter stars.

Try: Include exposure context: 'add dim subtle stars matching the very dark exposure' or 'add bright visible stars complementing the moonlit scene'

Tip: If your scene has moonlight or ambient light, mention it so AI adjusts star brightness accordingly.

Milky Way orientation doesn't look natural for the horizon

Why: The Milky Way's angle and position change throughout the night and seasons. Incorrect orientation can look obviously wrong to astronomy enthusiasts.

Try: Specify orientation: 'add Milky Way stretching vertically from horizon upward' or 'add Milky Way arcing horizontally along the horizon'

Tip: While most viewers won't notice, astronomers appreciate correct Milky Way orientation. Vertical is typical for summer evenings.

Quick answers

Do I need to select the sky before adding stars?

No! Just describe what you want: 'add a dense starry sky with the Milky Way' or 'add scattered stars across the night sky.' The AI identifies sky areas and avoids placing stars over foreground objects automatically. Only use markers if you need to define specific sky boundaries around complex silhouettes or adjust star concentration in certain areas.

How do I make stars look realistic and not obviously added?

Include natural variation in your prompt: 'varied brightness levels', 'random distribution', 'different sizes from tiny pinpoints to brighter stars'. Also mention viewing conditions: 'remote location with no light pollution' for dense stars, or 'suburban area with some light pollution' for fewer stars. Natural star fields are never uniform—variation is key to realism.

What is the best free AI tool to add stars to night photos?

EditThisPic's AI Starry Sky Maker adds realistic star fields and Milky Way effects by analyzing your sky darkness and foreground elements. Just describe star density and whether you want the Milky Way visible—no overlays or brushes needed. Creates natural-looking astrophotography in 15-30 seconds. Free to try with no signup or watermark.

Can I add the Milky Way galaxy or just stars?

Yes! You can add just stars ('add scattered stars with moderate density'), just the Milky Way ('add the Milky Way stretching across the sky'), or both ('add dense stars with the Milky Way galactic core visible on the right'). For maximum drama, request the galactic core specifically—it's the brightest, most colorful part of the Milky Way with orange and purple nebula regions.

Will stars appear over my foreground objects like trees or mountains?

The AI automatically detects foreground silhouettes and keeps stars in the sky area only. For complex skylines with many overlapping objects, you may need to use markers to define the exact boundary between sky and foreground. Most simple compositions (mountain peaks, single trees, tents) work perfectly without markers.

How many stars should I add to look realistic?

It depends on your scene's location. Remote wilderness with no light pollution: 'dense star field with thousands of visible stars'. Rural areas: 'moderate star density'. Suburban or near cities: 'sparse stars with some light pollution'. The key is matching star count to realistic viewing conditions. More stars isn't always better—it needs to make sense for the location.

Ready to add stars to your night sky?

Free to try. No signup required.

Try it free