Free β€’ No signup Fix Backlight Β· Free

AI Backlight Fixer

Brighten dark subjects in backlit photos while preserving natural detail instantly.

Original photo before AI Backlight Fixer
Before
β†’
Result after AI Backlight Fixer with EditThisPic
After

Free AI Backlight Fixer

Upload photo to fix backlight

Free β€’ Results in 30 seconds β€’ No signup

Release to upload

FreeNo signupNo watermark

Cost
Free No signup required
Time
Instant results in 15-30 seconds
Works on
Any device - browser, phone, tablet, desktop
Powered by
AI-powered photo editing

How it works

  1. Upload Your Backlit Photo

    Choose the image where the subject is too dark due to strong backlighting from windows, sun, or bright backgrounds.

    Expect: Simple fix: 20-30 seconds. Complex fix: 30-45 seconds and may need refinements.
  2. Describe the Backlight Problem

    Tell the AI which subject is too dark and what the bright background is. The AI will intelligently balance exposure to reveal shadow detail without blowing out highlights.

    Copy one of these to get started:

    fix Fix the backlight issue where the person's face is too dark due to the bright window behind them, brighten the face to show natural skin tones while keeping the window view properly exposed
    fix Correct the backlighting where the subject is silhouetted against the sunset, bring up shadow detail to reveal features while preserving the warm golden hour background
    fix Fix the backlit portrait where the subject is dark against the bright sky, increase subject brightness to show detail while maintaining the sky's natural blue color
    fix Balance the exposure where the indoor subject is underexposed due to bright outdoor light coming through glass doors, lift subject shadows while keeping outdoor view visible
    3 more prompts
    fix Correct the strong backlight from stage lights causing the performer to appear dark, brighten the subject to show costume details while maintaining the dramatic background lighting
    fix Fix the backlighting where the group photo subjects are dark with bright beach background, equalize exposure so faces are clearly visible while beach remains naturally bright
    fix Balance extreme backlight from snow reflections causing skier to be silhouetted, reveal subject detail and equipment while preserving the bright white snow environment realistically
  3. Review the Corrected Lighting

    Check that subject details are now visible with natural skin tones or textures while the bright background remains properly exposed without being overblown.

  4. Download Your Fixed Photo

    Save your corrected image in high resolution with no watermark. The balanced exposure reveals subject detail while maintaining scene atmosphere.

Try it free ↓

Free AI Backlight Fixer

Upload photo to fix backlight

Free β€’ Results in 30 seconds β€’ No signup

Release to upload

Free β€’ No signup

"I couldn't believe how good the result was. Took 30 seconds." via Product Hunt

See it in action

Original photo before AI Backlight Fixer
Before
->
Result after AI Backlight Fixer with EditThisPic
After

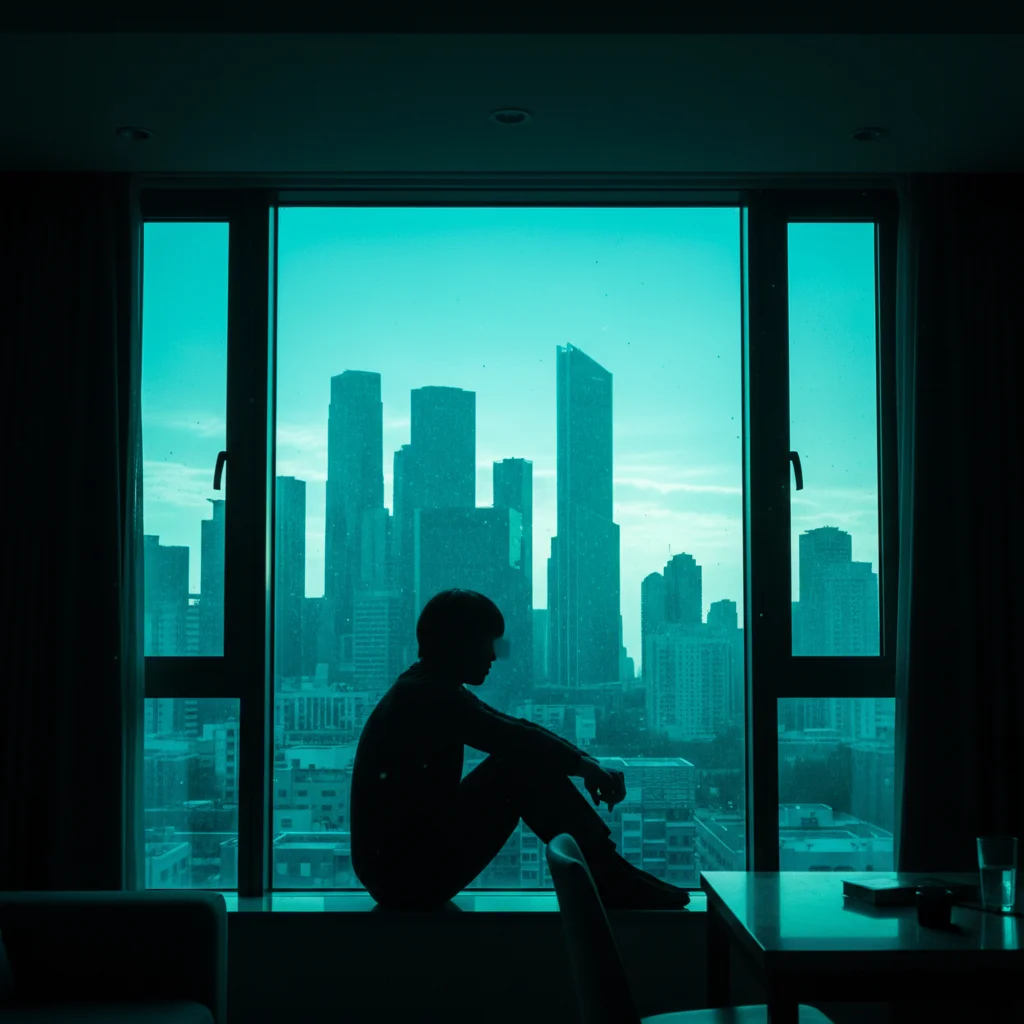
Window Backlight Portrait

Fix the backlight by brightening the person's face and clothing to show natural detail and skin tones while keeping the turquoise-lit window view properly exposed without overblowing

Prompt: Fix the backlight by brightening the person's face and clothing to show natural detail and skin tones while keeping the turquoise-lit window view properly exposed without overblowing
Original photo before AI Backlight Fixer
Before
->
Result after AI Backlight Fixer with EditThisPic
After

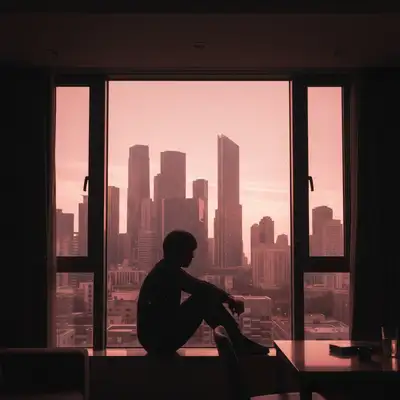
Sunset Silhouette Fix

Correct the backlighting to reveal faces, clothing details, and natural colors in the group while preserving the dramatic orange-magenta sunset atmosphere in the background

Prompt: Correct the backlighting to reveal faces, clothing details, and natural colors in the group while preserving the dramatic orange-magenta sunset atmosphere in the background

Detailed Guides by Scenario

πŸ“·

Photo Rescue & Restoration

Revive old, damaged, or poorly-shot photos with AI backlight β€” bring new life to images you thought were unsalvageable.

Common Scenarios

  • Applying backlight to old family photos that have degraded over time
  • Fixing a once-in-a-lifetime shot (wedding, graduation) that suffers from poor quality
  • Using backlight on scanned prints to get crisp digital versions

Best Practices

  • Scan old photos at the highest DPI your scanner supports before uploading for best results
  • Describe the specific issue β€” 'this photo is too dark and blurry' gives better backlight than a generic prompt
  • For severely damaged photos, work in stages: fix the biggest issue first, then refine
πŸ“·

Professional & Business Use

Ensure photos for websites, presentations, and marketing meet professional standards with backlight.

Common Scenarios

  • Using backlight on employee photos for a company website that need to look polished
  • Applying backlight to event photos before sharing in a client presentation
  • Improving product images with backlight for an online store or catalog

Best Practices

  • Process all images in a batch with the same enhancement settings for visual consistency
  • For web use, balance enhancement quality with file size β€” overly large images slow page loads
  • Always compare before and after to make sure backlight looks natural, not over-processed
πŸ“·

Social Media & Personal Sharing

Make your personal photos look their best before sharing with friends, family, or followers using backlight.

Common Scenarios

  • Quickly applying backlight to vacation photos before posting on social media
  • Using backlight on a selfie that has great composition but poor lighting
  • Batch-fixing a phone gallery of photos with backlight before creating an album to share

Best Practices

  • Start with the photo you'd most like to share β€” fix that one first and use the same approach on the rest
  • For selfies, subtle enhancement always beats heavy processing β€” keep it natural
  • If the photo was shot in low light, mention it in the prompt so the AI tailors backlight accordingly

If something looks off

AI changed the wrong area or something I didn't want changed

Why: The AI couldn't determine exactly which area you meant from description alone.

Try: Tap a marker on the specific area you want to change, then regenerate with the same prompt

Tip: Markers tell the AI 'I mean THIS one specifically.' Use them when description alone is ambiguous.

Subject became too bright or unnatural looking
Try: Request 'natural looking' or 'subtle' correction in your prompt. Ask to maintain realistic skin tones and textures rather than maximum brightening.

Tip: Include 'keep natural texture and detail' in your prompt to avoid over-processing.

Background got overexposed or blown out
Try: Specifically mention 'preserve background highlights' or 'keep background properly exposed'. Emphasize balancing rather than just brightening the subject.

Tip: Describe the lighting direction in your prompt, like 'soft light from the left side.'

Colors look wrong after backlight correction
Try: Request that color balance be maintained. Mention specific colors that should remain natural (skin tones, sky blue, clothing colors).

Tip: Specify the exact colors you want, like 'warm natural tones' or 'cool blue tint.'

Some areas still too dark or too bright
Try: Be more specific about which areas need adjustment. Reference subjects by location or description (person on left, face in center, background sky).

Tip: Describe the lighting direction in your prompt, like 'soft light from the left side.'

Result looks flat without depth
Try: Ask to maintain contrast and depth while fixing backlight. Request that the correction 'preserve dimensional lighting' or 'keep natural shadows'.

Tip: Try adjusting your prompt wording if the first result isn't perfect β€” small changes make a big difference.

Quick answers

Do I need to mark the backlit subject or background?

No marking required. Just describe what's too dark (the subject) and what's causing the backlight (window, sun, bright background). The AI analyzes the exposure imbalance and corrects it intelligently.

How does AI fix backlighting differently than exposure adjustment?

AI backlight fixing selectively brightens underexposed subjects while preserving bright backgrounds, maintaining natural lighting transitions. Simple exposure adjustment would overexpose backgrounds when brightening subjects.

Can this fix severe backlighting like direct sun?

Yes, works with strong backlighting including direct sunlight, bright windows, or stage lights. The AI recovers shadow detail even in challenging conditions, though extreme cases may have limits on recoverable information.

Will this work on group photos with backlighting?

Yes, effective for multiple subjects. Describe the group as backlit and the AI will balance exposure across all people while preserving the background, maintaining consistent lighting across the entire group.

What if I want to keep some dramatic backlighting effect?

Specify 'subtle correction' or 'preserve dramatic lighting' in your prompt. You can request just enough brightening to show subject detail while maintaining the artistic backlighting atmosphere.

Is EditThisPic's AI backlight fixer really free?

Yes β€” you get 1 free edit per week, no account needed. For unlimited edits, plans start at $3.99/month.

Can I fix backlight on my phone?

Yes. EditThisPic works in any mobile browser β€” iPhone, Android, tablet. No app download needed.

What photo formats does the AI backlight fixer support?

JPG, PNG, WebP, and HEIC. Upload any common photo format and EditThisPic handles the rest.

Ready to edit your photo?

Free to try. No signup required.